Kowaxial


Designer:
Bill S. (4thtry on PETT)
Project Category:
Tower Speakers
Project Level:
Advanced
Project Time:
20+ Hours
Project Cost:
$500 – $1,000
Project Description:
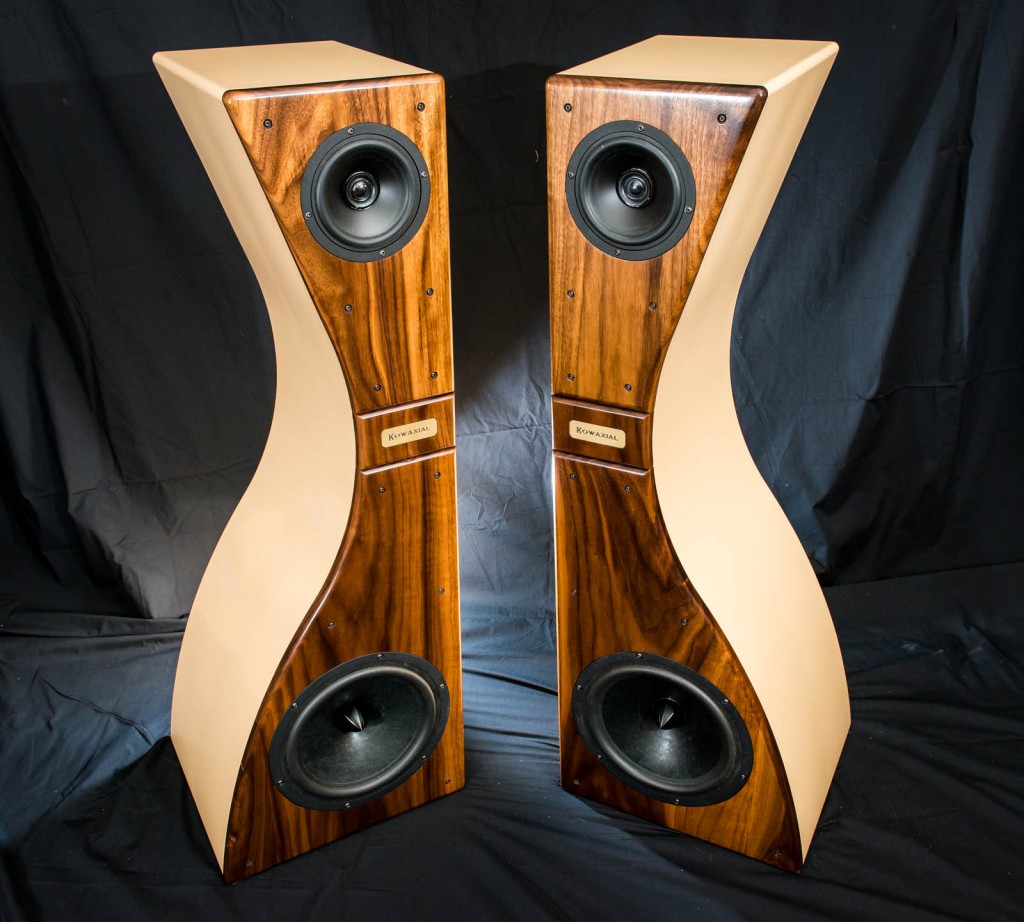
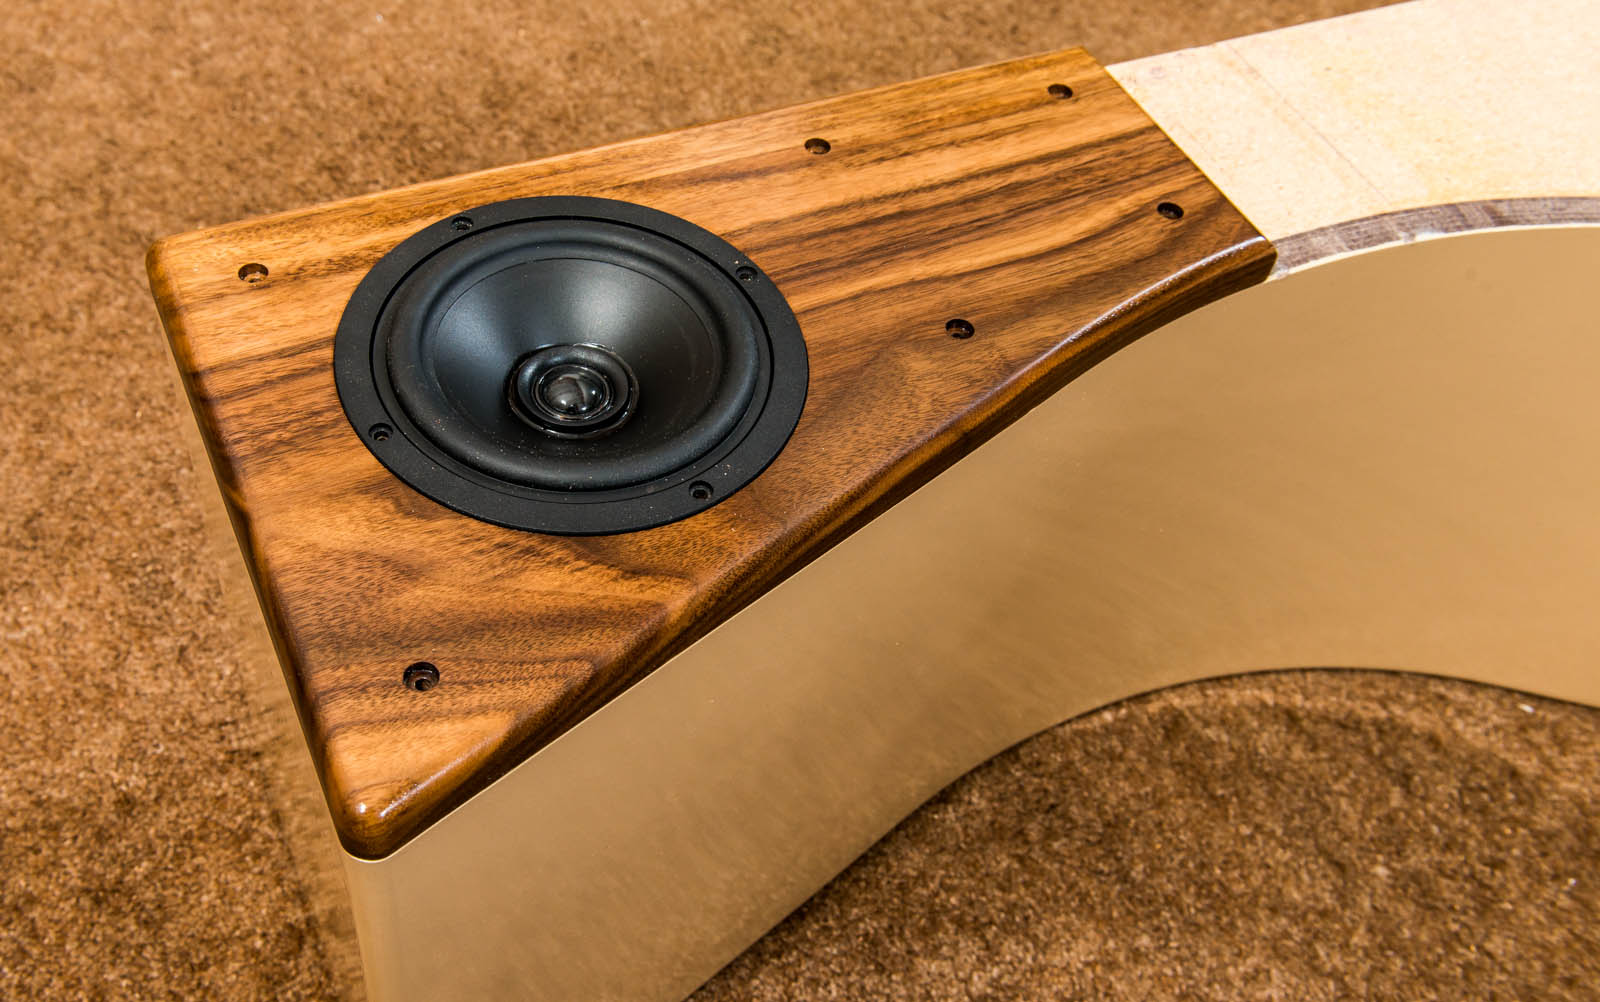
This is a small tower speaker using the new Dayton CX150-8 coaxial mid/tweeter and the reference series Dayton RS270P-8 10″ woofer. It features an artfully shaped curved cabinet combined with solid walnut upper and lower baffle boards.
Design Goals:
My goal was to design the very best sounding coaxial type speaker that I could with plans to enter it in the InDIYana 2018 “Keeping up with the Jones” competition (held in Fort Wayne, IN, April, 2018). Contest rules limited the woofer size to 10″ and the total internal cabinet volume to 2 cubic feet. Later on, I was also planning to enter this speaker in the MWAF Speaker Design Competition, so I gave the cabinet an unusual shape to create added interest during the show.
Driver Selection:
The coaxial driver selection process was very easy. During last year’s MWAF Speaker Design Competition, my name was the first one pulled from the door prize hat. The next thing I knew, I had a free pair of the new Dayton CX150-8 coaxial drivers in my hands.
Woofer selection was just as easy. The next day, during the tent sale, I found a pair of Dayton reference series RS270P-8 woofers at substantial discount. Parts Express ran the T/S parameters for me, which showed that this driver would work out just fine in a 1.75 cu. ft. box tuned to about 30Hz or so. I was all set!
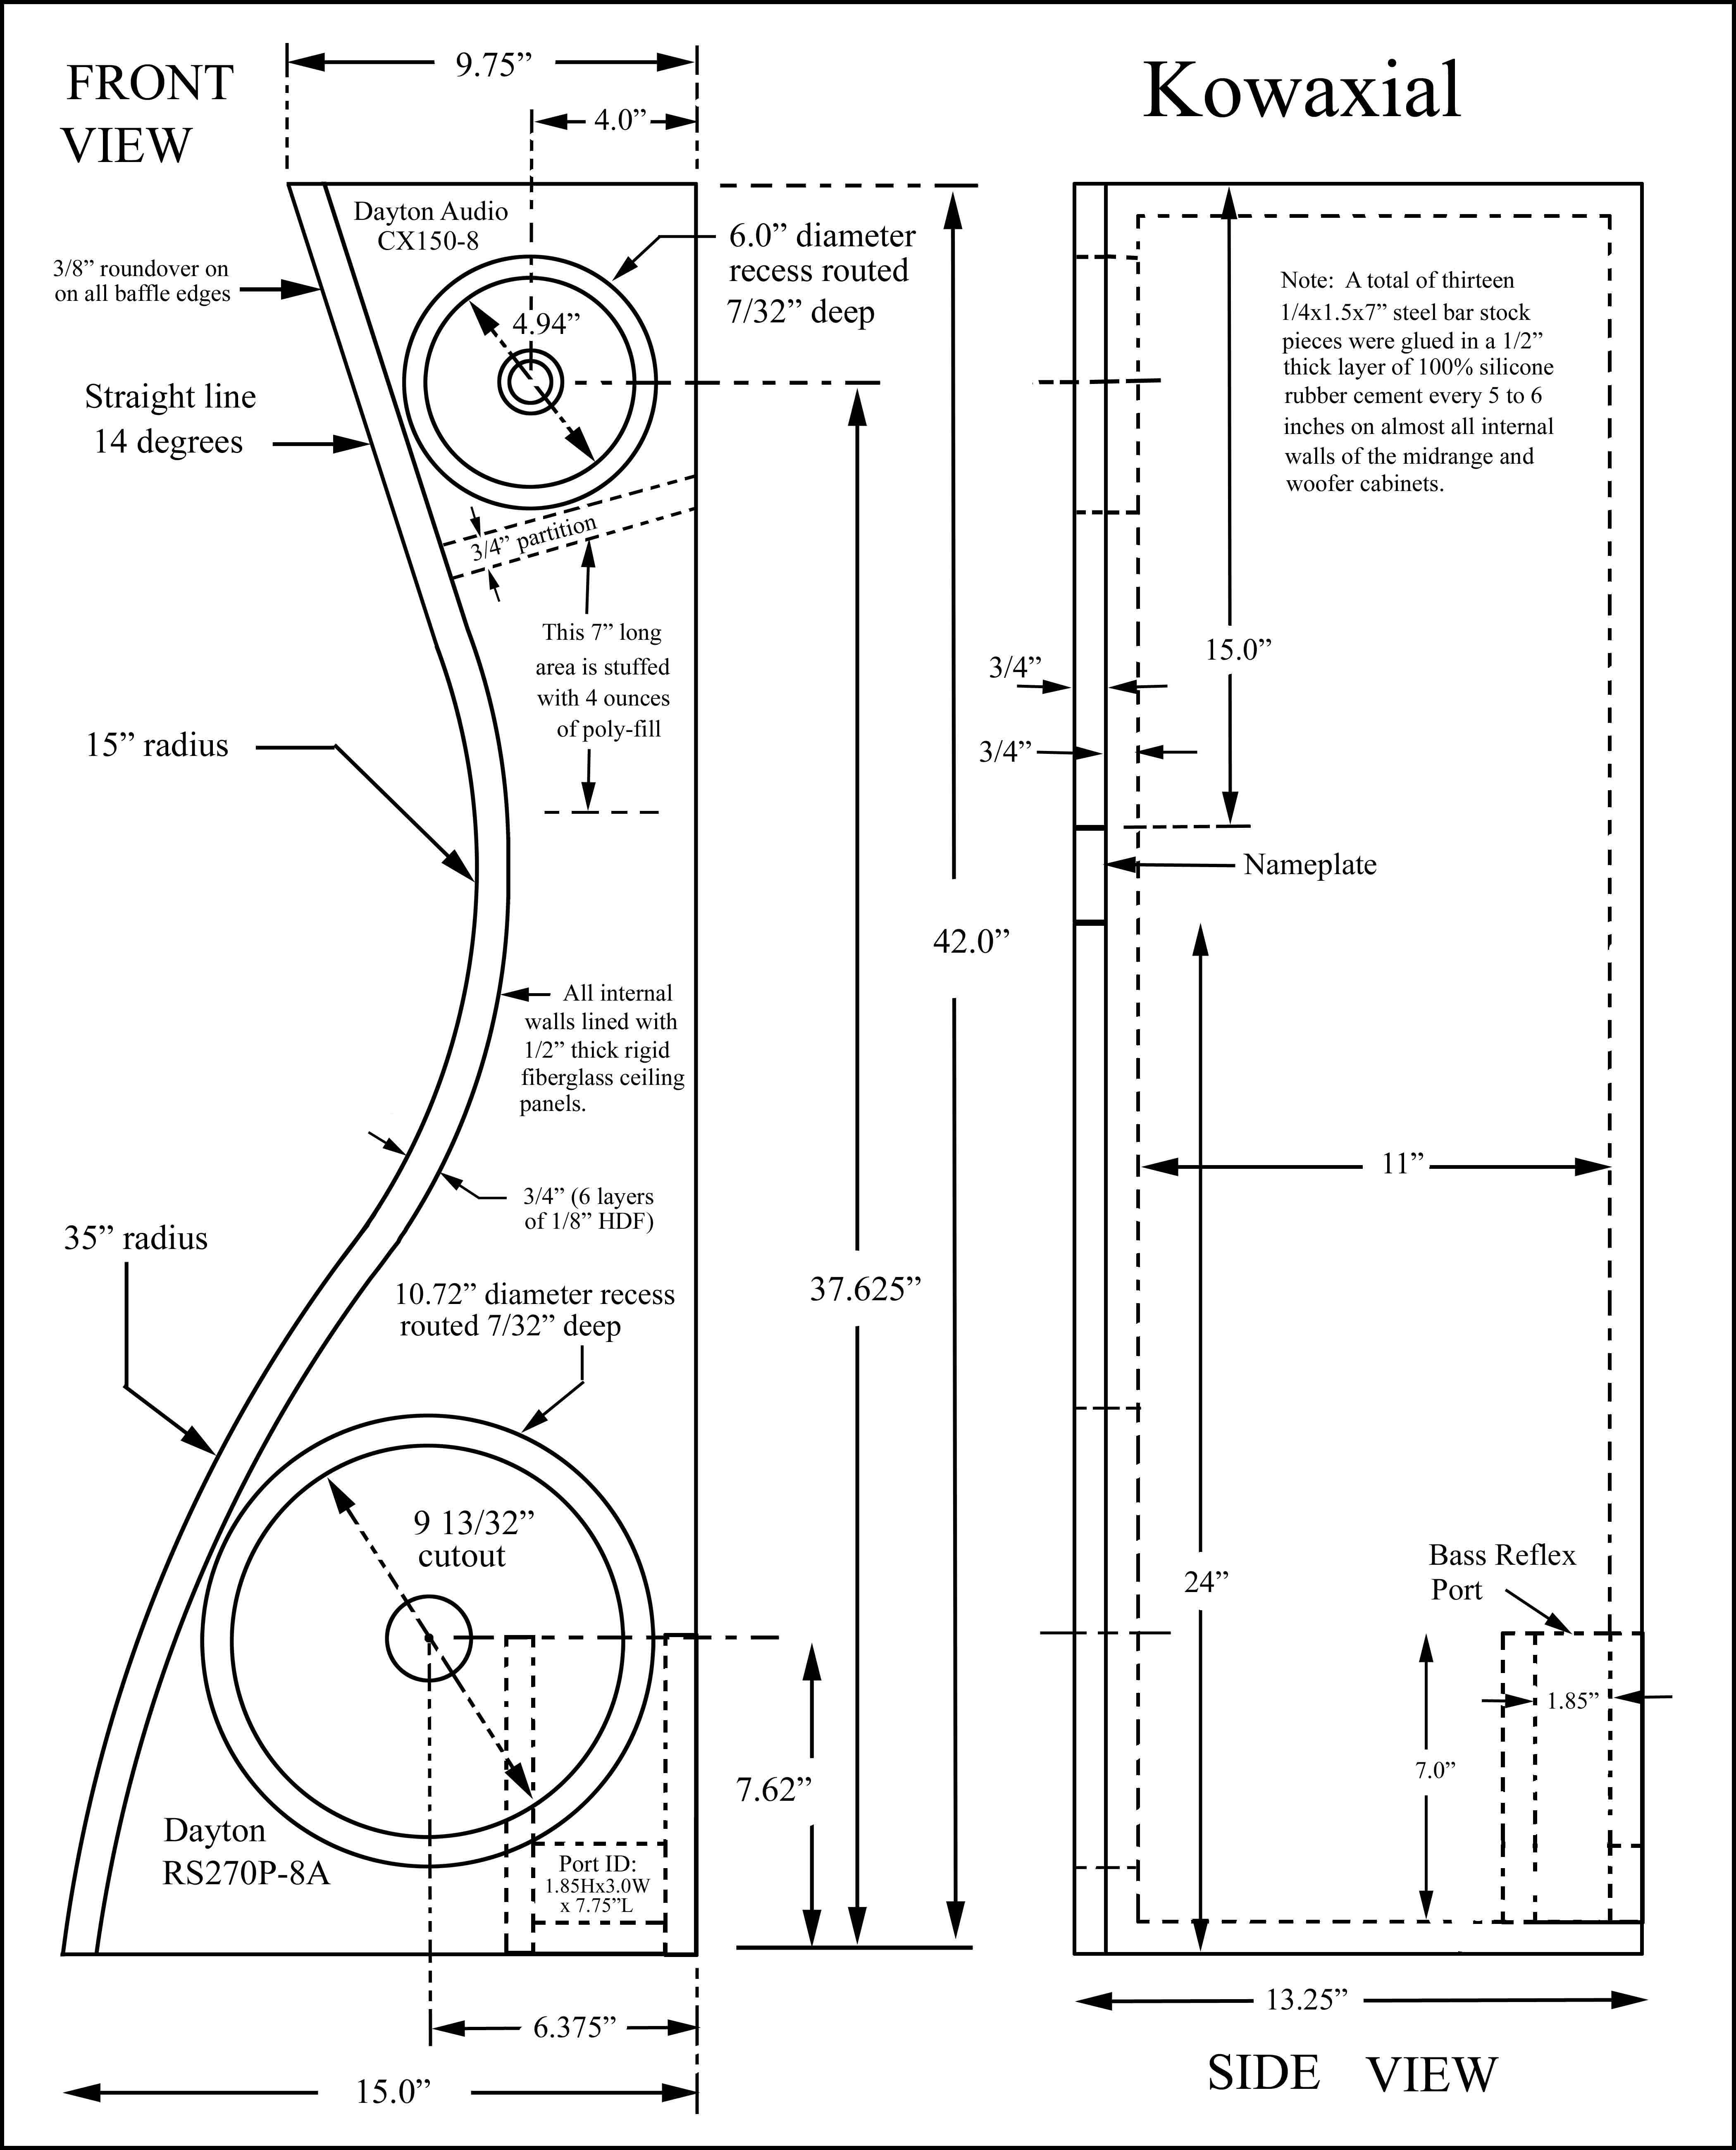
Enclosure Design:
The basic cabinet is constructed of 3/4″ thick particle board material throughout. The upper and lower baffle boards are a 1.5 inch thick composite of 3/4″ particle board and 3/4″ solid walnut.
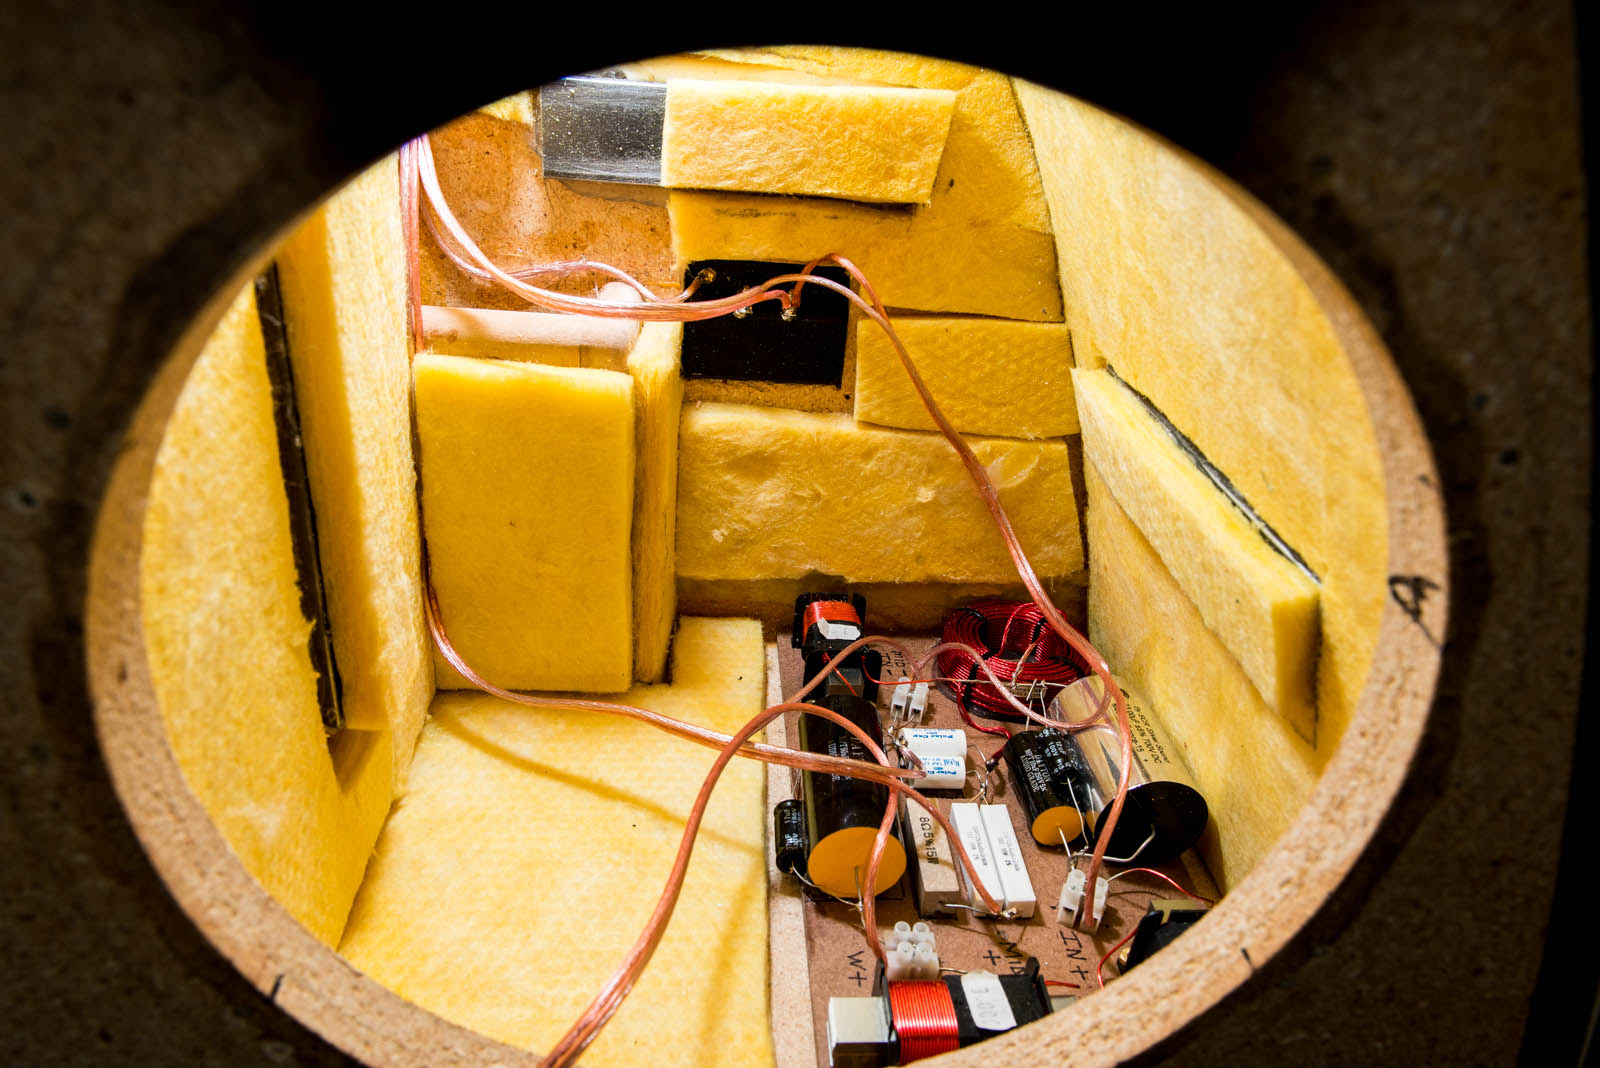
I put the coaxial driver in an upper, sealed 0.25 cu. ft chamber and stuffed it with Acousta-Stuf and fiberglass at a rate of approximately 0.75 lbs per cubic foot. I put the woofer in the lower 1.7 cu. ft. volume and tuned it to 30Hz. The port is a rectangular affair with an ID of 1.85″ x 3″ and a length of 7.75″. The woofer cabinet is lined internally with 1/2″ fiberglass throughout and stuffed at the upper end with 4 ounces of poly-fill
I mass loaded all internal mid-range and woofer cabinet walls every 5 to 6 inches with heavy, 1/4″ thick steel bar stock. Each piece of bar stock measures 1/4″ x 1.5″ x 7″ and floats individually in a thick 1/2″ layer of 100% silicone rubber cement. This results is a very dull knuckle rap test on all sides and back.
Enclosure Assembly:
The curved side panel is a composite of 6 layers of 1/8″ thick tempered HDF material, glued together with yellow wood glue. I spent a full week building a special fixture to clamp this curved side panel in place. I used approximately 3/4 gallon of yellow wood glue! A substantial portion of this glue was sacrificial and dripped away during the clamping process! I put down several long strips of wax paper along the lower edges to catch the glue before it hit the floor!!
I finished the cabinets with oil based primer and then several coats of “sand” colored high gloss enamel. I finished the solid wood baffles with Danish oil to darken the walnut. After the Danish oil had dried completely, I finished the walnut with 10 to 15 light coats of semi-gloss lacquer.
Crossover Design:
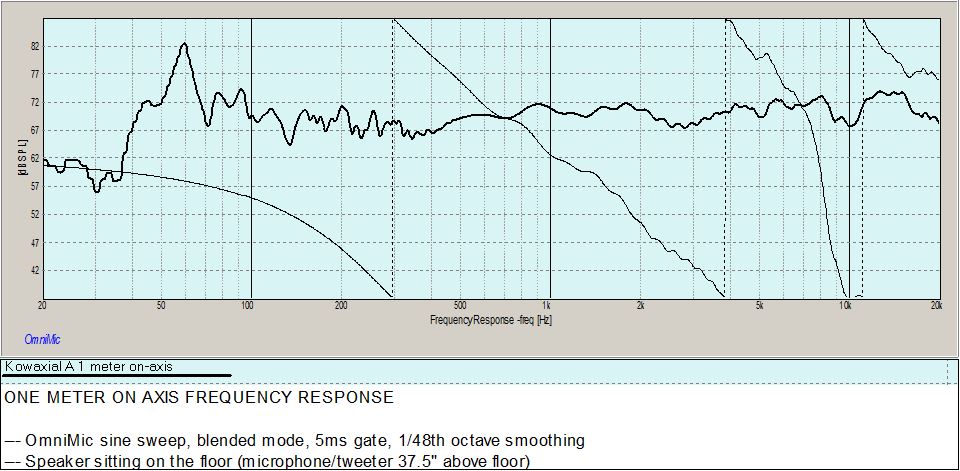
After finishing the cabinet and mounting all drivers, I used OmniMic and DATS V2 to create a complete set of on-axis FRD and ZMA files to develop the crossover. I used the blender software package to merge diffraction adjusted near and far field woofer and mid-range measurements.
But I made one small mistake that had a huge impact on the design. My woofer is located 7.5 inches from the floor and I failed to properly take into account the floor boundary reinforcement effect. As a result, when we played the speakers at InDIYana, they sounded very fat and heavy in the mid-bass (a very dark tonal balance).
So it was back to the drawing board. After several additional “mistakes” I came up with a “re-design” that sounded fairly good. I knocked out the phase plugs on the RS270P-8’s and replaced them with dust caps. I glued a small 30 ounce steel washer to the back side of the dust cap to increase the mass of the cone and reduce the woofer output by about 2-3dB. Then I glued a small enclosure filled with poly-fill to the back of the woofer magnets to seal off the vented pole piece and “re-tune” the voice coil cavity to eliminate an unexpected 150Hz resonance created by my dust cap modification!
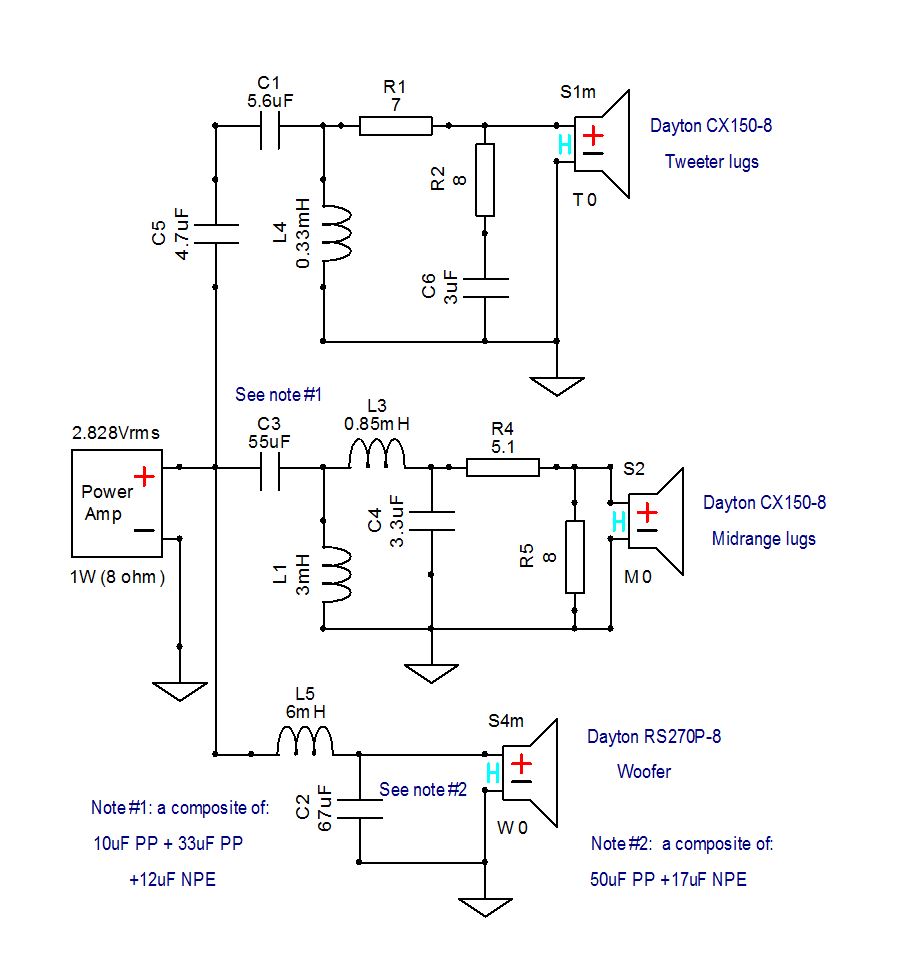
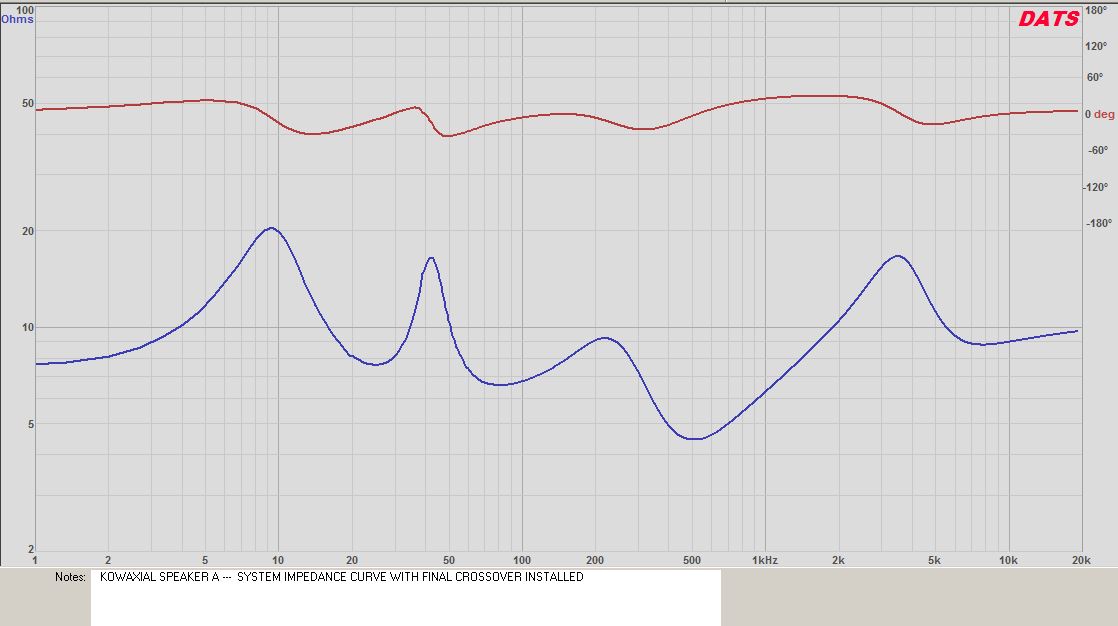
I set the tweeter to mid crossover at 4kHz, 12dB per octave electrical. I set the mid to woofer crossover at 400Hz, 12dB per octave electrical. Impedance dips to 4.5 ohms at 500Hz but the phase angle is good.. Overall sensitivity is approximately 87dB/2.83V/1 meter.
Tips & Tricks:
Attached picture caption listing:
PIC: CAPTION:
_DS52918: Completed speaker.
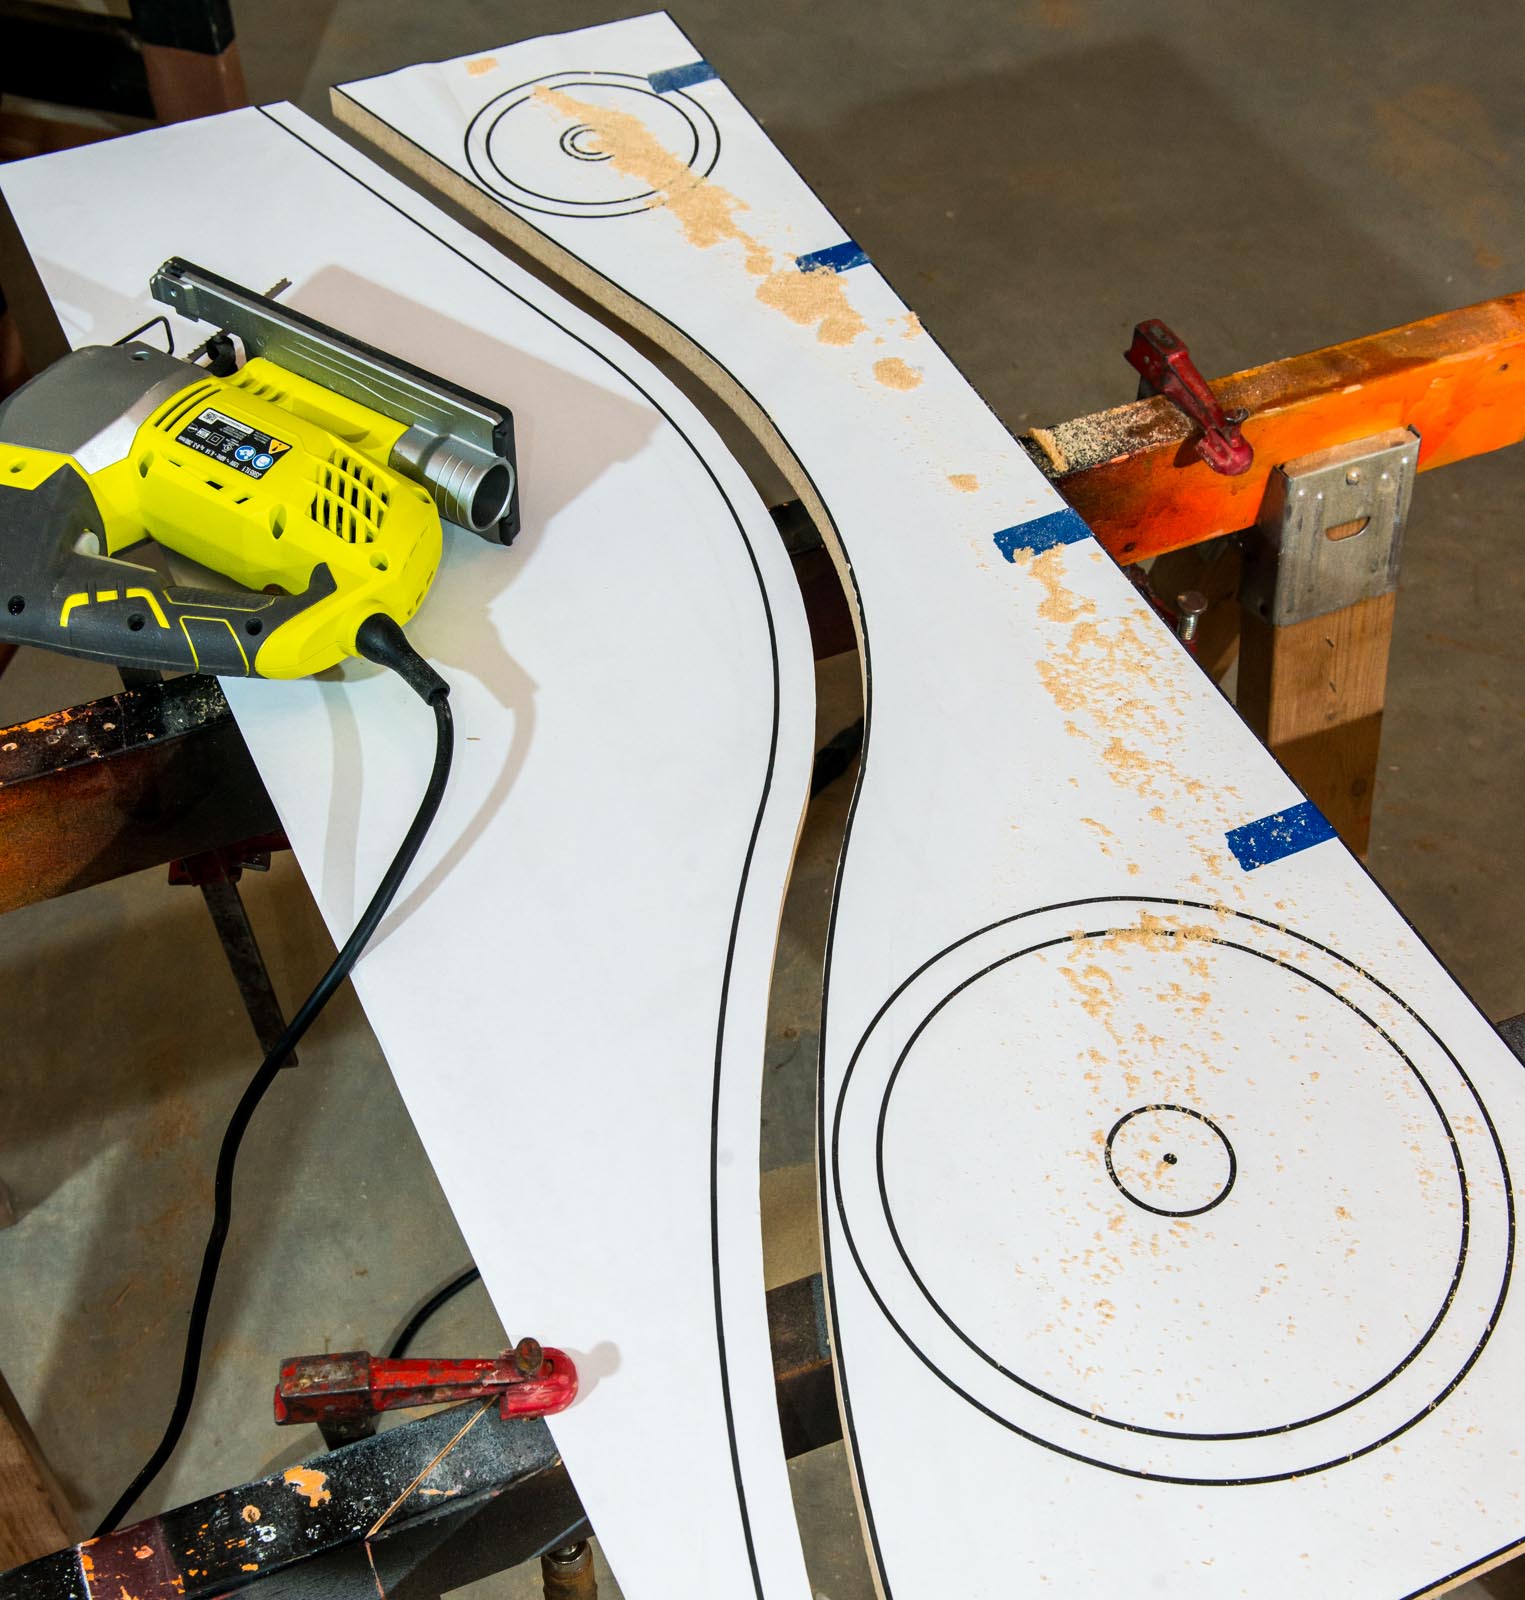
_DS49932: I made a full-scale template to cut the curved baffle boards with a jig-saw.
_DS50278: Glue up of the box shell, showing the angled upper & lower cabinet partition.
_DS50454: Glue oozes out as the custom clamping fixture applies pressure.
_DS50524: Six layers of curved 1/8″ HDF are fully set in place after removal of fixture.
_DS52221: A look inside the woofer cutout showing xover and input cup.
_DS52486: Upper walnut baffle finished and ready for attachment via pocket screws.
Conclusion:
In terms of sound quality, these speakers are very polite and easy to listen to. The overall tonal balance is very good from top to bottom, perhaps just a little bit heavy below 100hz or so. This speaker applies the full 6dB of baffle step compensation, so it should be located well away from the rear and side walls for the best overall sound quality.
About the Designer:
I have been building speakers and amplifiers, as a hobby, since the mid 1970’s. In my spare time, I enjoy football, fishing, camping, landscape photography, building amplifiers, and, of course, building speakers. I also enjoy attending the many DIY events in the Midwest to see what other speaker builders are up to. I do not have a formal degree in electronics or engineering. Instead, most of my skills have come from reading detailed construction threads posted on the PETT forum.
Project Parts List:
+ There are no comments
Add yours