The Toni Table Radio


Designer:
TomZ
Project Category:
Freestyle Speakers
Project Level:
Intermediate
Project Time:
20+ Hours
Project Cost:
$100 – $500
Project Description:
I’ve been trying to use my love of speaker building and electronic tinkering to bless others for the past few years… not to mention that there’s only so many speakers that can realistically exist in one house without it beginning to look like a stereo store, and I think we’ve been bumping up against that limit for awhile now. I don’t want to stop building speakers though — it’s just way too much fun. Well, my wife and I have a friend that has helped encourage us both to become more active and healthy, and I really wanted to build her and her husband a set of speakers, but I wasn’t sure they would want something that big in their house. We suspected that a small table-radio may be the best idea in this case. I like the idea of a small, bluetooth connected, and self-contained package that can reproduce rich sound, and not take up a lot of room on a table or counter. In fact, I’ve wanted to build a table radio for several years, and I finally took this opportunity to design, and put one together.
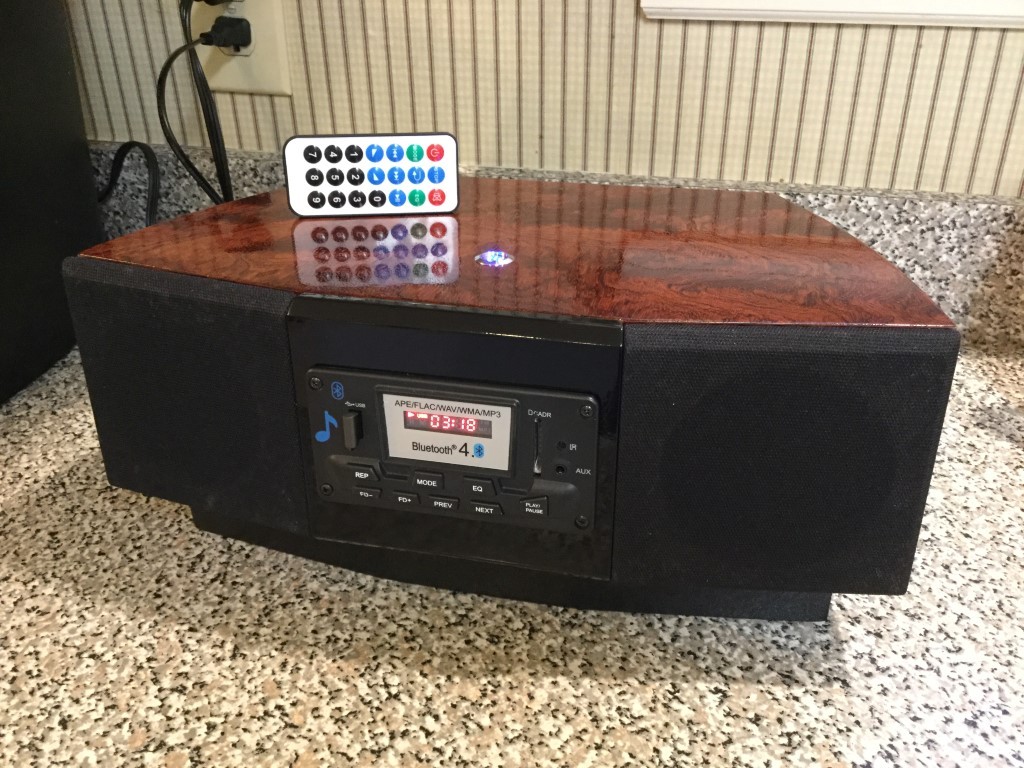
It’s a compact stereo radio that is basically constructed in two parts, the bottom base, and the main radio section. Both upper and lower sections are needed to provide the required air volume to reproduce the bass needed to reproduce realistic music at decent levels. I finished the project with some gorgeous Waterfall Bubinga that was gifted to me by a generous forum member. No one will confuse this radio with one from the big box stores, that’s for sure.
Design Goals:
I wanted realistic bass and ‘even’ sound… meaning no ‘shouty’ midrange that makes you want to cover your ears and hide when the artist begins to sing. It had to be very compact as well… The commercial offerings in this arena are small, why can’t a DIY radio be small too? Some curves would be a must, and a few cool little touches, like a lighted on/off switch alone on top, and a magnetically attached grill system.
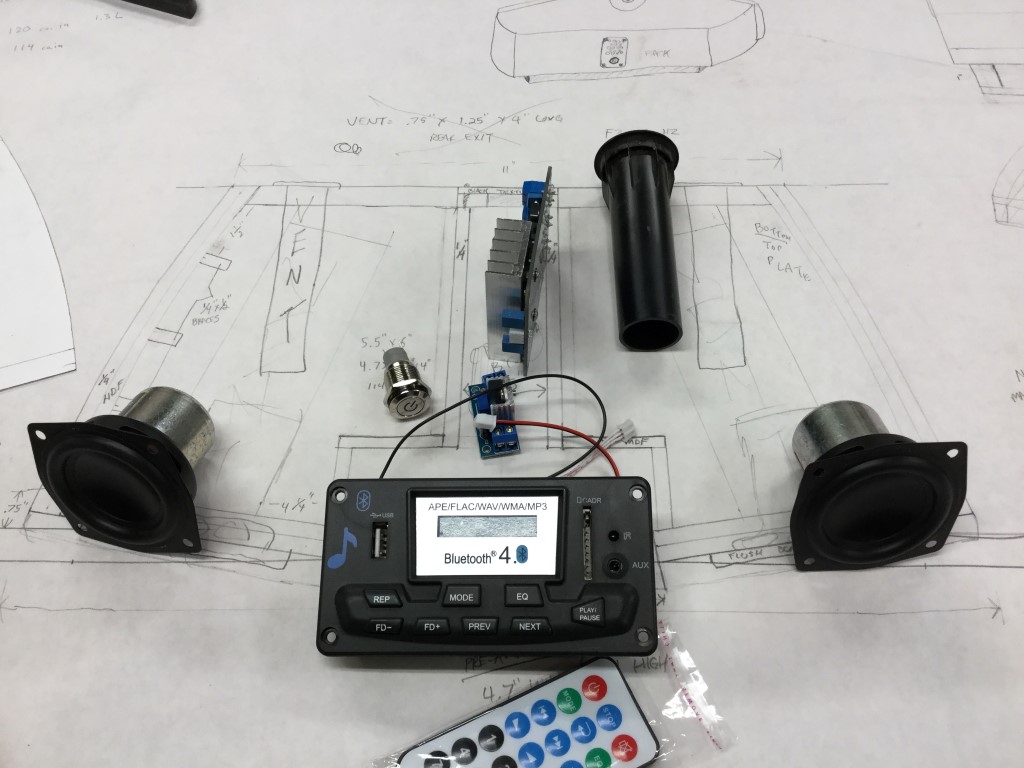
Also, I wanted to use the Parts Express faceplate preamplifier unit for the first time. It looked to have a good feature set with a minimal price tag… FM radio, SD card and USB inputs, line in and Bluetooth 4.0 inputs with a remote for under $20? Plus it played lots of file formats, not just MP3’s…It sounded too good to be true… was it? Read on.
Driver Selection:
Having used the Dayton Audio ND65-4 driver before in my “Sound Traveler” radio, I knew it was a kind of freak of a driver. Able to achieve mid 60 Hz bass with only a 2″ cone, it’s 3.5 mm of excursion stays reasonably clean due to its underhung design and motor venting.
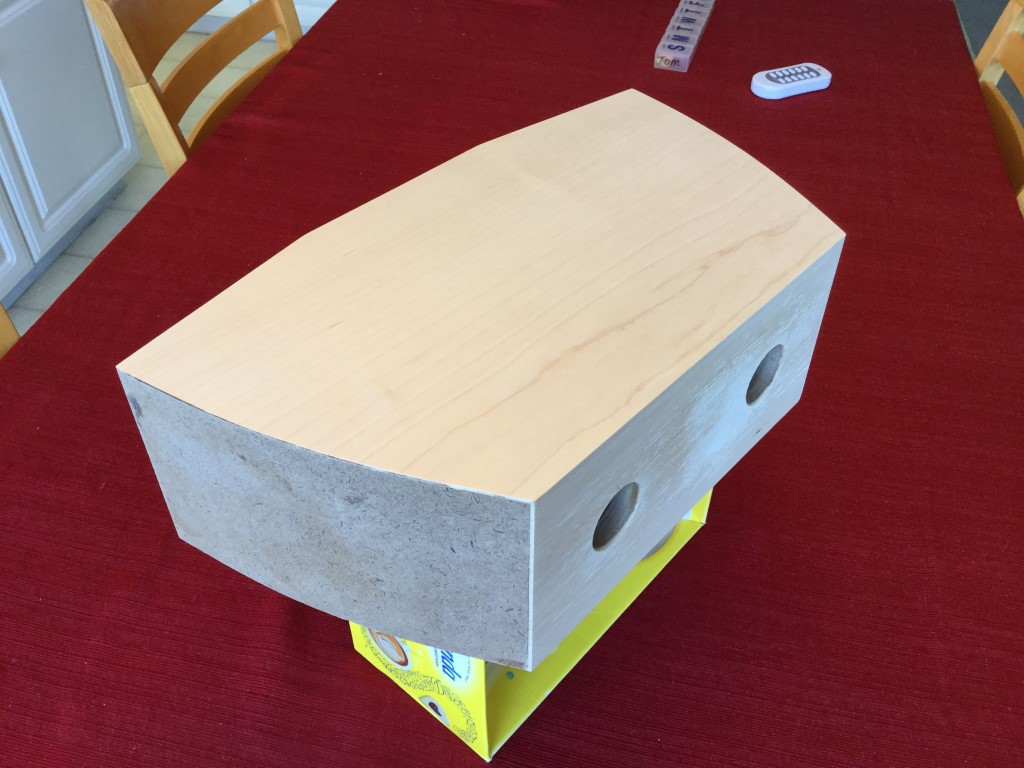
Enclosure Design:
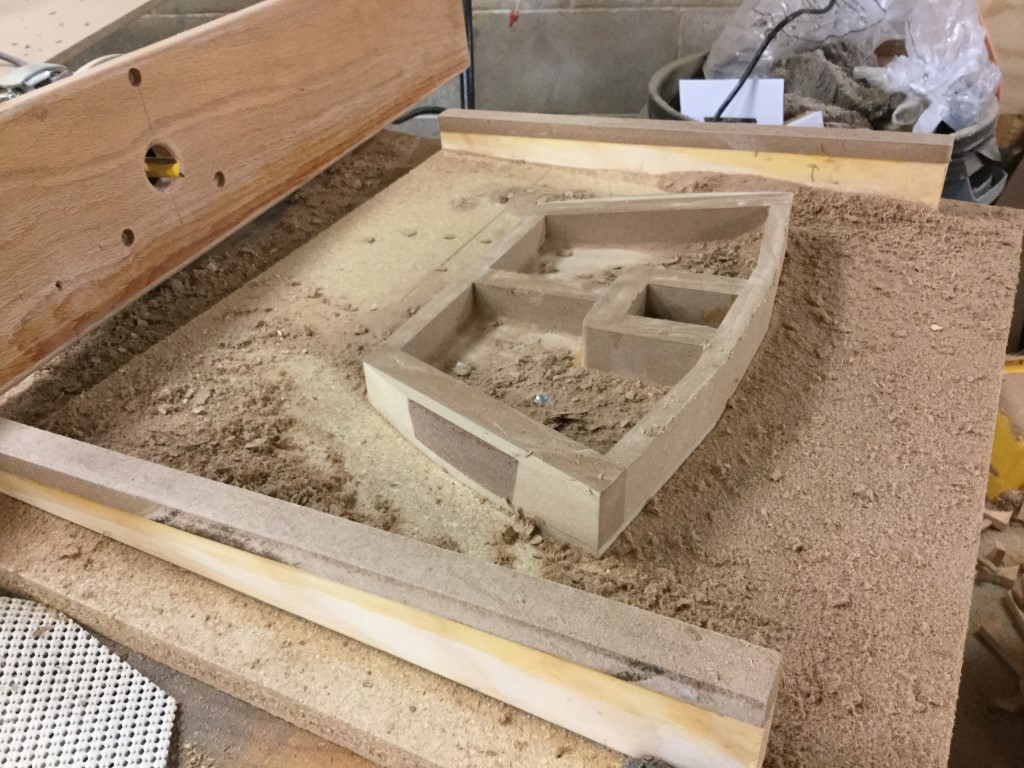
I like the look of the nicer table radios out there, but they are usually fairly plain looking. I wanted to mimic their basic form factor, but kick up the visual a bit. Like I said, this is really two enclosures joined together to give it a more svelte look, while allowing for the needed enclosure volume to make the most of the drivers excursion. The main body is approx. 14.5″ wide, 4.5″ high, and 8.5″ deep. The base is 1″ tall at the rear and 1.5″ tall in the front. This allows for the radio to be aimed up a bit to distribute sound better in the room — plus it looks cool. I had to create a jig to get this taper; it was done with a router attached to a strong board sliding on tapered, angled guide boards. It’s 7″ deep and 12.75″ wide with front angles that mimic the top radio section.
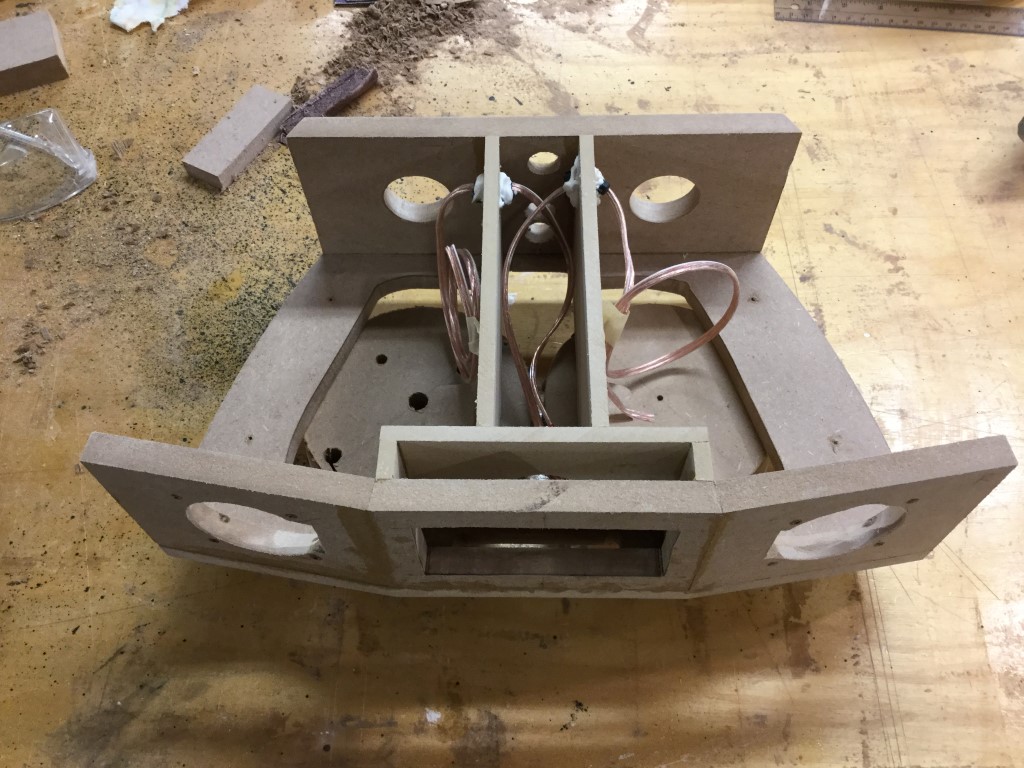
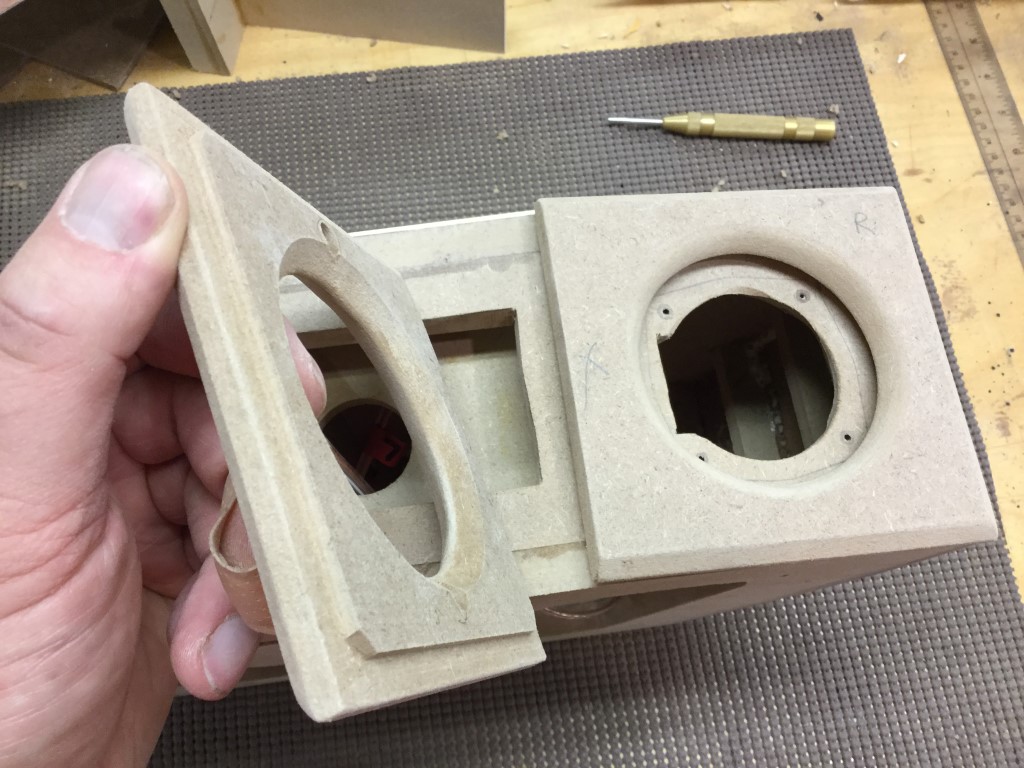
Enclosure Assembly:
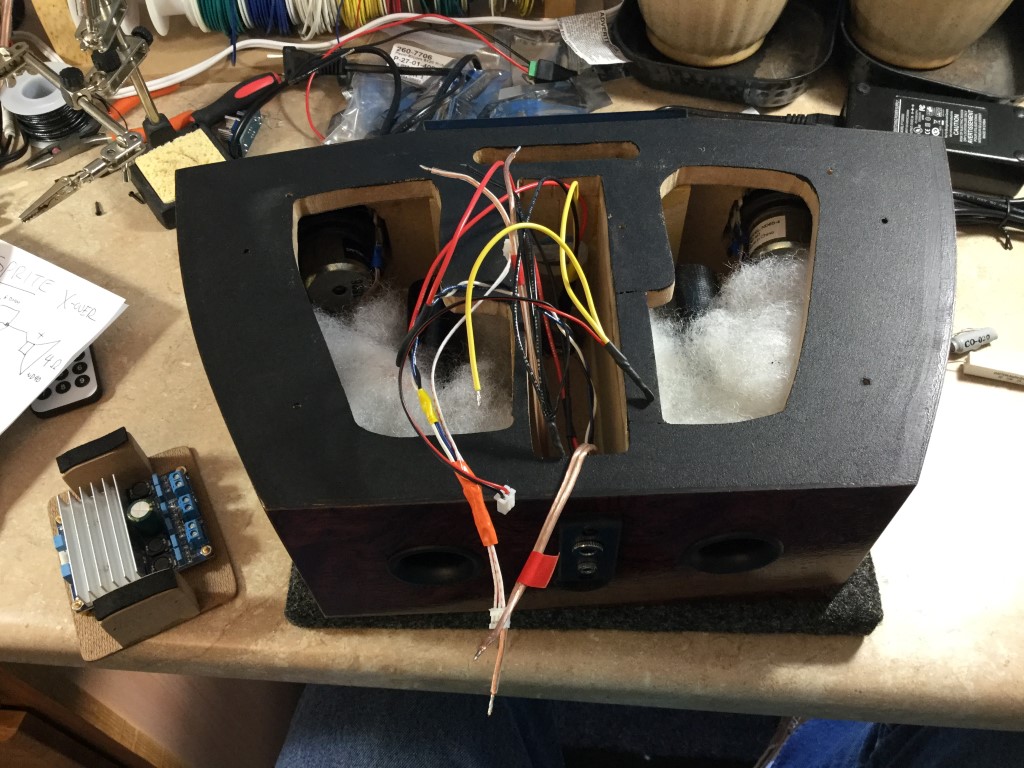
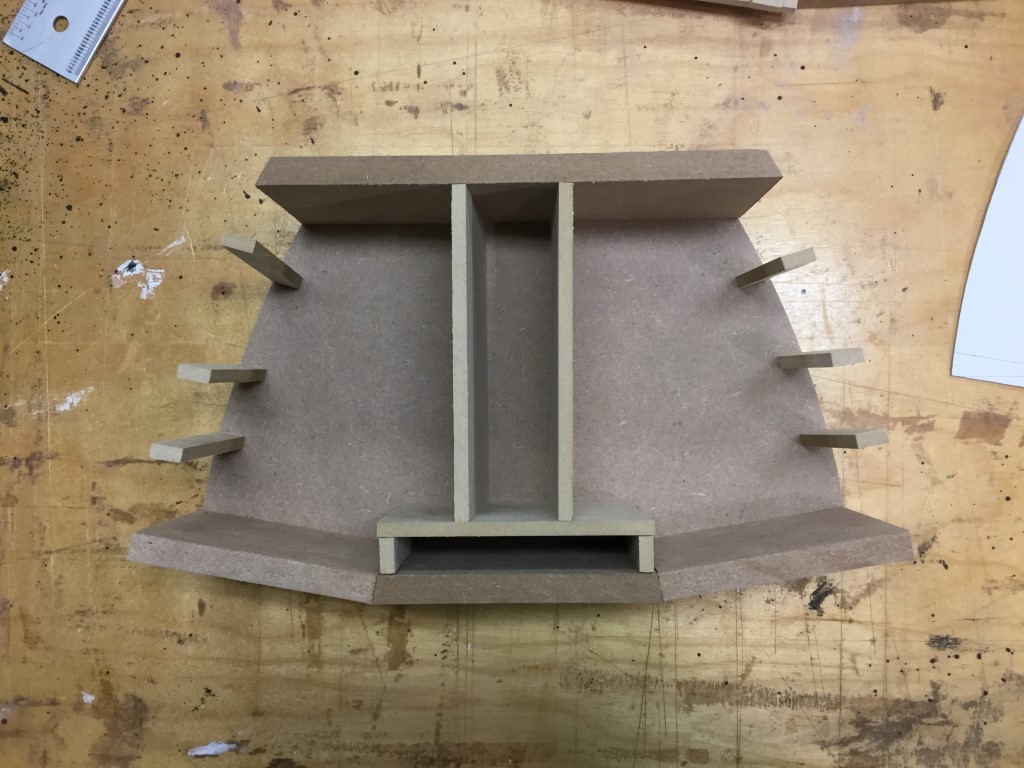
Both the top radio portion as well as the base have three compartments inside. The small middle section houses the amplifier, faceplate, crossover components, and associated wiring. The sides are curved on both the base and the top enclosure (See picture of the clamping jig I created to secure the sides to the cabinet during the glue-up process.) The main radio tapers to 9.5″ wide at the rear using two sections of 1/8″ HDF, where the curve on the base is just sanded on a belt sander as this was easy to accomplish due to its small size. I used Gorilla glue for almost everything with the exception of gluing the two pieces of 1/8″ HDF sides to each other — I used wood glue for that. Also, I used construction adhesive to glue the finished black faceplate housing piece to the main cabinet. There are three 1/4″ x 1/2″ MDF braces on each side to support the sides as it glued to the main cabinet. The inner pieces are 1/4″ MDF.
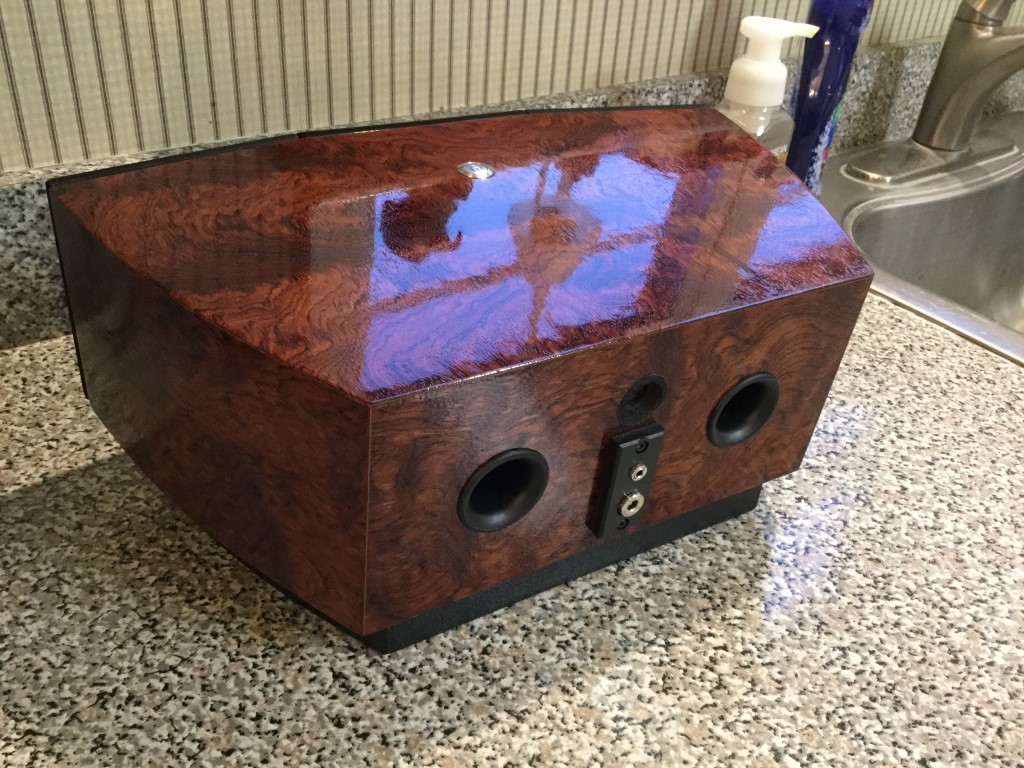
The cabinet volume per driver side is around 1.6 liters, tuned to 67 Hz or so with a 1″ x 6″ long vent. I lengthened the vent with black gorilla tape to get the 6″ length since the original vent is only 4″ long.
In order to minimize the effects of the end grain of the cabinet showing through the veneer over time, I skinned the top and back with a 1/16″ layer of maple veneer to avoid this. I’ve found that doing so can nearly eliminate the ‘ghosting’ that can occur otherwise.
The veneer had a few coats of boiled linseed oil applied, followed by several coats of sealer – sanding lightly with a 220 grit sanding sponge between coats. The finish is actually clear spray lacquer applied by spray cans. I think I used less than two full cans to do this.
Crossover Design:
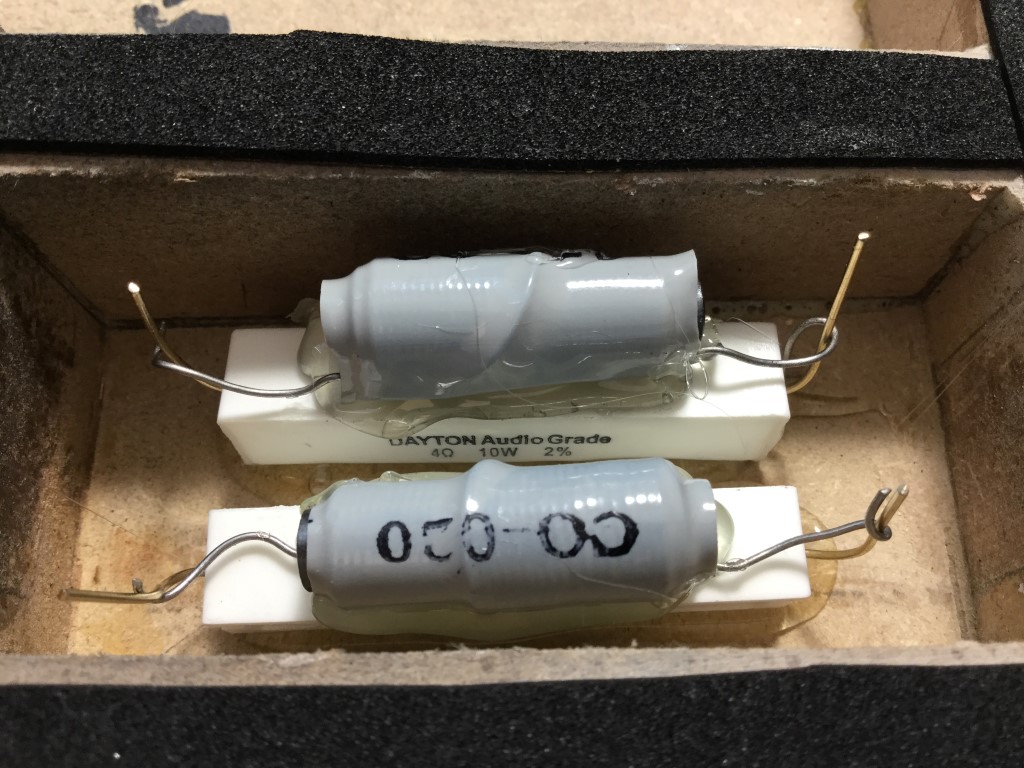
After the project was mainly complete, I installed the drivers, attached the grills with the cloth on, and took measurements on my Omnimic. I then created a filter consisting of a parallel .20 mH coil and a 4 ohm resistor inline with each speakers positive (+) lead. This evened out the midrange level, left the highs mostly untouched, and allowed for a few decibels of baffle step compensation so the radio would sound more ‘full’ in the lower frequencies. You’ll notice in the pics that I used a fairly cheap buyout iron core inductor because I had it on hand. It seems to work fine.
Tips & Tricks:
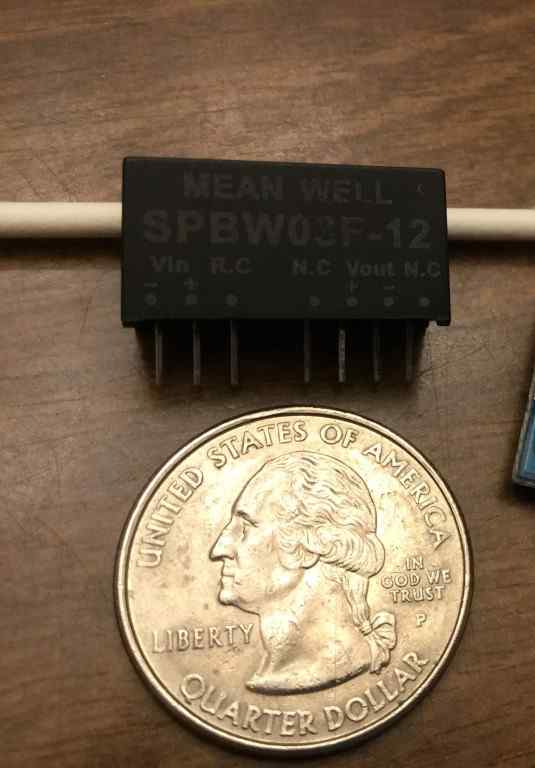
Initially, the faceplate unit and the amplifier didn’t want to play nice together. Having noise issues is not an uncommon problem when dealing with small amp boards powered by switching power supply units and this project was no exception. With some help from my friends at Parts Express ‘Tech Talk’ forum however, a suitable solution was discovered. Noise introduced to the amplifier by the 12V power ground lead common to both the amp and the faceplate was the issue. By using a DC/DC convertor to ‘isolate’ the ground from the amp to the radio, the noise was eliminated. I glued this into the front area where the faceplate mounts with hot glue.
The bluetooth faceplate preamp unit is really a nice unit for the price with a good Bluetooth range and quick responses to inputs. For example, when I ‘volume-upped’ my iPod connected to Bluetooth, it automatically upped the volume on the radio faceplate, showing rising numbers instantly in conjunction with my iPods volume. The FM radio even pulled in a few stations with decent quality, though I suspect the main source of input will be Bluetooth. I did put 30 songs or so on a USB flash drive and found the quality of playback to be excellent. Also, the Bluetooth faceplate unit plugs right into the amplifier boards input — the included cable hooks right to it, no soldering required.
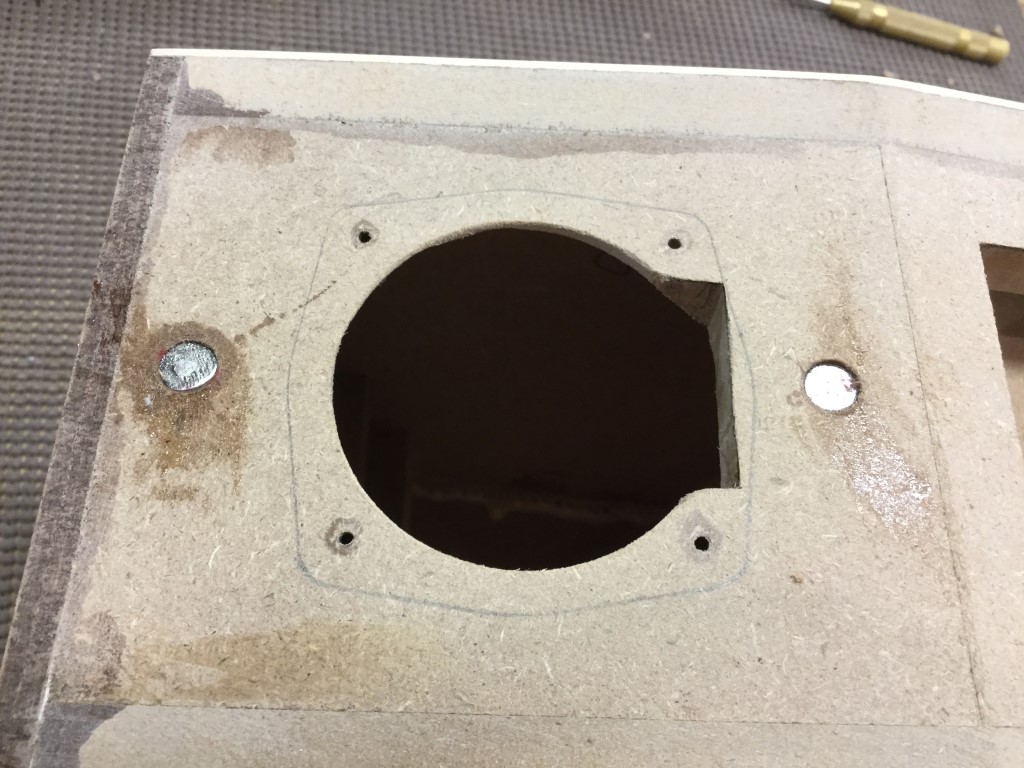
The amplifier is mounted to a MDF bracket that is ‘friction-fit’ into the opening by using a few pieces of foam gasket to create the needed pressure to keep it in place when pushed into position. (see photo)
I used a 12v power supply to power everything with since it simplified the design a lot. I think the amplifier works best at 16V or so with 4 ohm speakers, but set up this way, it can easily overpower the drivers, so I think 12V is more than enough in this case.
I used about a softball-sized amount of poly fill in each speaker compartment.
The binding post listed in the parts was hacked to accommodate the DC input jack. The two existing banana jacks were removed, the plastic part drilled for the larger DC jack size, and then installed using blue thread locking compound. I originally installed a 3.5mm stereo jack for a possible future subwoofer hookup, but found this to be an issue noise-wise, and quickly removed it in the name of sanity.
I also installed a dishwasher screen gasket in the upper rear of the cabinet to allow for heat to escape in case the internal amp gets warm. The bottom front of the cabinet has a small slot under the faceplate to allow for air intake, and convection cooling to take place.
Conclusion:
This radio sounds much bigger than it looks. It will reproduce music loud enough to make conversation difficult while maintaining its composure for the most part. It just doesn’t sound like it could possibly be a pair of 2″ drivers making all this noise. Watching those little drivers pumping away like a ‘mini-me’ sized 12″ woofer cracks me up, and yes… the bass is real. There’s a solid 60 Hz available at reasonable listening levels — and when placed on a kitchen counter near the back wall, the low end fills in nicely. I’ll say it again, the little Dayton ND65 is a real special driver; it’s what makes this combination work so well, producing some actual bass, while keeping the overall size reasonable.
About the Designer:
I’ve been building speakers since I was a kid and have recently gotten into smaller amplifier radio projects as well. I’m always learning things as this project proves. I enjoy challenging myself with different woodworking designs… Coming up with a neat design and wondering how in the world I’ll figure out how to build it excites me, and is part of the reason I keep at this. The challenge is great fun, and the reward of a beautiful, amazing sounding design is extremely satisfying to me.
Project Parts List:
|
Part # |
Description |
Qty |
|
290-204 |
Dayton Audio ND65-4 2-1/2″ Aluminum Cone Full-Range Neo Driver 4 Ohm |
2 |
|
320-606 |
TDA7492 Digital Audio Amplifier Board 2x50W |
1 |
|
320-348 |
12 VDC Bluetooth 4.0 FM Radio MP3 WAV FLAC Audio Preamp Board with Function Cables and Remote |
1 |
|
120-056 |
12 VDC 5A Switching Power Supply with 2.5 x 5.5mm Plug |
1 |
|
090-5018 |
2.5mm Metal Panel Mount DC Jack |
1 |
|
260-470 |
Speaker Cabinet Port Tube 1″ ID x 4″ L Flared |
2 |
|
004-4 |
Dayton Audio DNR-4.0 4 Ohm 10W Precision Audio Grade Resistor |
1 |
|
257-024 |
Dayton Audio 0.20mH 20 AWG Air Core Inductor Crossover Coil |
2 |
|
260-301 |
Parts Express Banana 5-Way Speaker Wire Binding Post Terminal |
1 |
|
329-045 |
Parts Express Magnetic Grill Guides 0.395″ Dia. x 0.2″ H 8 Pcs. |
1 |
|
N/A |
Isolated Meanwell DC/DC converter 9-36VDC input, 12VDC output |
1 |
|
N/A |
Lighted push on/off 12V switch |
1 |
Truly works of art! That finish on the veneer is nothing less than professional. I have a few questions about the mirror finish as i’m About to attempt this for the first time on my newest project. You mentioned you used a sealer, may I ask what type and brand, and is it necessary to use a sealer and not just a base oil then clear coat? And I was thinking of using a clear enamel, rustoleum, instead of lacquer, any thoughts on this? I would greatly appreciate your input. Thanks and again superb work!
Aaron,
Thanks for the kind words. I really am not the greatest at finish work; It’s one of the areas where I’m still learning. Usually I just go for a half dozen or so coats of wipe-on Polyurethane and I’m happy with the look. For this I decided to try and go a bit further. After the veneer was sanded smooth, I put on a few coats of boiled linseed oil (BLO) many call it, and let it sit 10 minutes or so, then wiped it off. That’s what gets you the nice rich color, but it’s not shiny yet.
The next thing I did was Zinsser seal coat, it’s an alcohol based shellac based sealer that seals the oil based BLO so it won’t interact with the next step. It also fills in the grain just a bit so the finish ends up being smoother. After a few coats of that sanding lightly in between, I used several coats of Lacquer in a spray can to get the nice finish on it. I sprayed several light coats and that is what I came up with. It’s not perfect, but it does look pretty nice. By the way, if the finish does look nice, it’s courtesy of some of the fella’s on the Tech Talk board that Parts Express hosts. They have some great ideas and are generous with their advice.
Thanks for the input Tom! I too used BLO to bring out the color and have been experimenting with the enamel. I plan on doing many light coats to fill in the grain, which might take 20+ coats, and of course roughing it up with some 0000 steel wool in between coats. I’ll see if I need to do a multistage polish or not, but I’m looking to get a very high gloss polish ideally mirror finish. Keep a look out for my build I’ll be posting it in a month or so hopefully if the build is done in that time.
I forgot to check the box for an email notification, so if possible please email @ motherfluxer69@gmail.com lol
Beautiful! I always admire your woodwork Tom!
Thanks a lot for the kind words sir!
This isn’t really all that hard to make, it’s a bunch of really small pieces, so it goes fast if you keep at it. I’m moving slower these days, so it still ended up taking me awhile.
TomZ
Beautiful! Simply Beautiful.