Concrete Blocks
Designer:
Ben Gravell
Project Category:
Bookshelf Speakers
Project Level:
Beginner
Project Time:
1-8 Hours
Project Cost:
Under $100
Project Description:
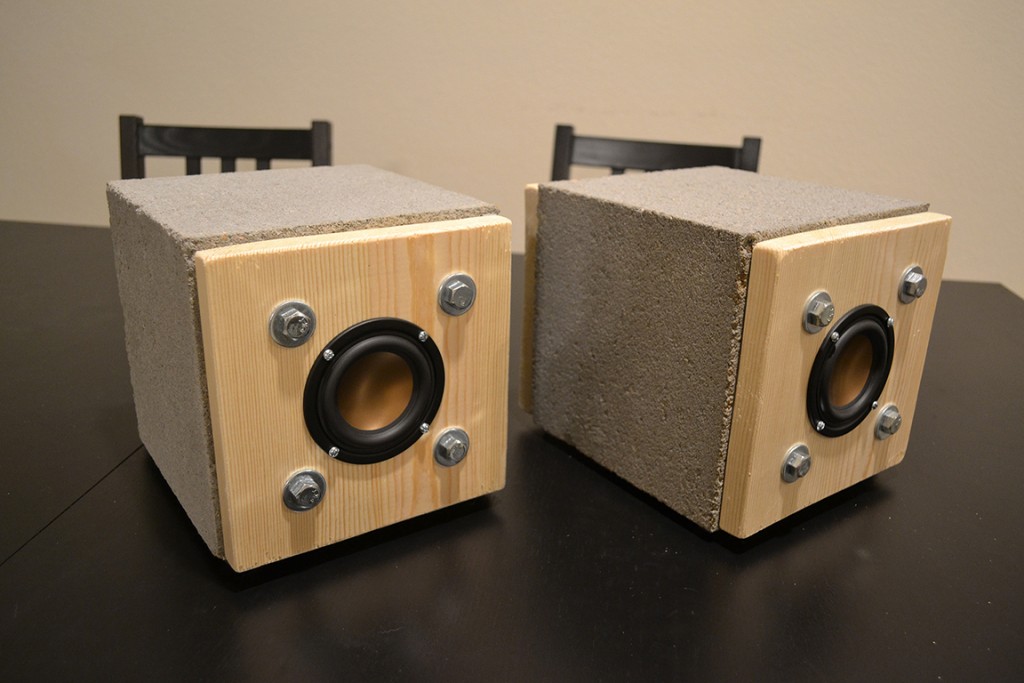
For anyone looking for a simple, easy, and cheap speaker project that looks unique and sounds great, I present to you the Concrete Blocks! Suitable for beginners and apartment-dwellers or anyone looking for a quick single-weekend project.
Design Goals:
This project had multiple goals:
1) Sound nice, so that music, movies, and games can be enjoyed more fully using them
2) Be suitable for apartment use. This ruled out high sound pressure levels and deep bass, which actually complemented the other goals
3) Be easily fabricated by anyone with only a small set of tools
4) Look aesthetically pleasing and unique
Driver Selection:
The HiVi B3N 3″ Aluminum Driver Round Frame Part # 297-428 was chosen for its low price, great wide-range frequency response, and modern minimalist appearance. This driver is a long-time Parts Express favorite and staple, which made it an easy pick.
Enclosure Design:
The enclosure was designed to be as easy to fabricate as possible, without the need for large shop tools for extensive woodworking. To that end, the bulk of the enclosure was made of a concrete block with nominal dimensions of 8″ by 8″ by 8″ which can be purchased at virtually any hardware/home improvement store for about 1.00 USD. To complete the enclosure, solid wood front and rear baffles were used. These were made from a simple straight rip cuts on a nominal 3/4″ by 8″ by 6′ white pine board. The front baffles were then given 2.875″ diameter holes by cutting along a pencil-traced path with a jigsaw – this gave admittedly messy and imprecise results, but front-mounting the driver hid this. Better results could have been obtained by using a hole saw, but as long as the driver fit through the hole and the speaker-mounting screws had enough material to thread into, it had no negative effects. Holes were also drilled for thru-bolts and for the rear wire terminals. Four thru-bolts of 3/8″ diameter and 10″ length were used on each enclosure to hold the front and rear to the concrete enclosure, effectively functioning as a giant clamp. Standard 3/8″ washers were used on the front and rear faces of each bolt and nut, as well as split-washers on the rear to provide extra fastener security.
From an acoustic standpoint, the near-cubical internal dimensions were not optimal and likely create an undesirable ‘bump’ in the frequency response in the 100Hz-200Hz midbass range. However, in my application I was able to mitigate this by the use of EQ – even the extremely low-priced Kinter MA-170 I obtained had a nice bass cut/boost control centered at 100 Hz which was able to tame excessive boominess, which was not as significant as I had feared it would be.
Enclosure Assembly:
With the boards fully cut, the drivers were front-mounted to the front baffles using #6-32×0.75″ pan-head wood screws. The wire terminals were similarly fastened to the rear baffles. For ease of potential disassembly in the future, 8″ wire leads were soldered to both the speaker tabs and the wire terminal tabs, then spliced together using standard screw-type wire connectors. Final assembly of the enclosure was extremely simple. After adding a gasket of closed-cell weatherstripping around each baffle’s perimeter, all it took was to align the front and rear baffles on the concrete faces and hand-tighten the thru-bolts, then to come back around and fully tighten until the split-washers were fully compressed. Rubber feet were also added to the bottom of the concrete blocks to avoid marring the surface of whatever the speakers sit on.
Crossover Design:
A crossover was not included in this design for two reasons: 1) simplicity and 2) in my application the speakers are run completely full-range at low power only.
Tips & Tricks:
The tension in the thru-bolts combined with the high coefficient of friction between the concrete faces and the front/rear baffles will be more than sufficient for restricting lateral (up-down and left-right) movement of the baffles, so internal battens/alignment blocks would have been redundant.
The diameter of the thru-bolts does not matter, but I could only find bolts in the 10″ length as small as 3/8″ which drives the cost up a bit. Hex or carriage bolts would work, but I chose hex bolts as an aesthetic preference. If you have a proper tool to cut metal, you could buy a cheaper long length of threaded rod and cut it to size.
If you had access to a tool for creating chamfers, you could chamfer away the inside edge of the speaker hole to promote airflow. I found that even without this step the speaker functioned well and mid-bass response did not suffer.
Conclusion:
For an investment of $50 and a half-day’s time, I was able to fabricate a pair of speakers capable of exciting, pleasant sound and striking yet understated visual appearances using only simple set of tools. It was a great starter project that I hope inspires others to jump into the world of speaker design and construction!
About the Designer:
Ben Gravell is an engineer who loves enjoying music, the outdoors, and electro-mechanical curiosities of all sorts.
Project Parts List:
|
Part # |
Description |
Qty |
|
297-428 |
HiVi B3N 3″ Aluminum Driver Round Frame |
2 |
|
260-300 |
Two Conductor Speaker Wire Spring Terminal |
2 |
|
100-050 |
JSC Wire 18 AWG Red/Black Zip Power Speaker Wire 1 ft. USA |
16 |
|
N/A |
Concrete Blocks |
2 |


Forget the bolts! Get a small tube of construction adhesive..
Great idea! I have thought about doing this as well.