
Premios

Designer:
Dan Neubecker (dlneubec)
Project Category:
Freestyle Speakers
Project Level:
Intermediate
Project Time:
20+ Hours
Project Cost:
$500 – $1,000
Project Description:
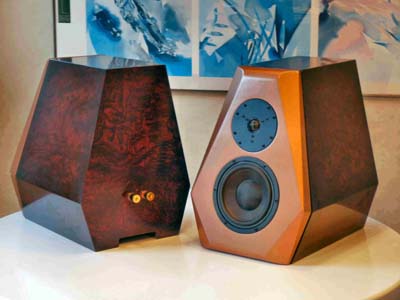
Premios are a high performing, stand-mount, passive 2-way speaker utilizing top notch, yet cost effective drivers, some of the best available to DIYers on the market today.
Design Goals:
The main goal was to design a relatively compact, stand-mount speaker, with state of the art drivers that can effectively cover a frequency range of sub-30 Hz to 20 kHz. A smooth power response and wide off axis dispersion were equally important factors. Low distortion and engaging sound that would draw in the listener were also high priorities. The aesthetic was intended to be unique yet doable for the typical woodworker, though well outside the standard box shape. The shape is reflective of the functional benefits the design choices provide, i.e. form follows function.
Driver Selection:
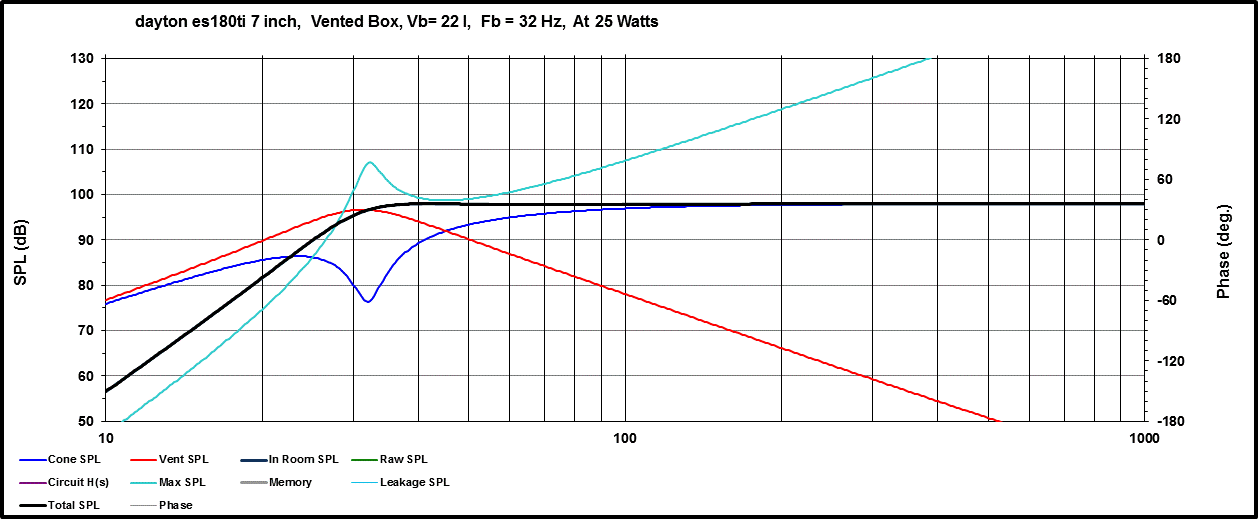
Woofer: The new Dayton audio, ES180ti – 7″ Esoteric Series Woofer 8 Ohm, was the first choice to anchor the bottom end. This driver is both beautiful to look at and can dig to an F3 of around 29 hz with this enclosure size/box tuning configuration. Distortion is impressively low and driver breakup is very well controlled and easily addressed in the crossover, allowing for a crossover in the 2 kHz range. The bass is authoritative and midrange very engaging.
Tweeter: The Transducer Lab N26CFR-A 1” dome tweeter. There are many tweeters that could have been selected to work with this woofer at the targeted crossover point. I’m very familiar with the Transducer Lab tweeters having used them in several previous projects. They are all very robust, extremely low distortion transducers with unusually smooth on and off axis frequency response and wider dispersion than even most ¾” domes. Frequency response is only down about 6 decibels at 60º off axis at 10kHz and only around 12 dB at 18 kHz. Off axis response is extremely smooth and well controlled. Sensitivity is quite high, though this is not really critical for this design. I happened to have a pair of the N26CFR-A, carbon fiber domes sitting on the shelf and seemed the most obvious match to the carbon fiber ES180ti woofer.
Enclosure Design:
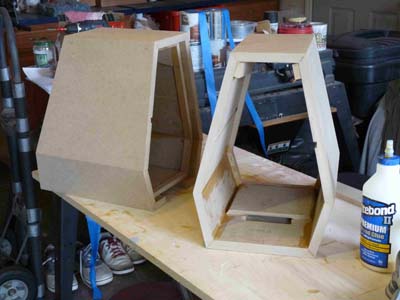
The enclosure design is a reflection of the acoustic benefits of non-parallel sides for reducing internal standing waves; slanted, tapered and chamfered baffles for reduced edge diffraction, smoother frequency response and potentially better imaging. The enclosure shape also reflects a desire to provide an aesthetic outside of the typical box look, though still not too difficult for the average woodworker to construct. The enclosure volume was optimized for optimum low frequency extension.
Tuning is 32 Hz with a slot port 9.17” long, yielding a predicted F3 of 29.17 Hz. The box sides are 3/4” mdf reinforced with additional 1/2” pieces and window-type bracing. In addition, a constrained layer damping system consisting of 3/16” rubber flooring and 1/4” hardwood plywood is glued to the center of the larger unsupported interior panels to further deaden enclosure walls. A single horizontal layer of 3.5” Ultratouch denim insulation, the width and depth of the box, is placed central to the enclosure, above the first window brace.
The slot port was designed to be incorporated in the base of the speaker and exits to the rear. A unique twist for this design was that the slot port is only 3-sided. The intent is to maximize the interior volume of the speaker, while utilizing the stand it sits on as the 4th side of the slot port.
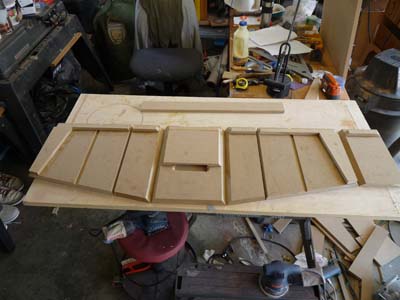
The baffle is made from 2 pieces of 3/4” mdf, which allows for the chamfering provided. The rear of the baffle was carefully chamfered to provide plenty of room for the woofer to “breathe”. The front baffle has about a 1/8” wide x 1/4” deep” reveal cut along the box interface to hide the seam and to provide visual interest.
As primarily an aesthetic choice, I went with the large, carbon fiber binding posts for this enclosure. They are not quite deep enough to get through the 3/4”walls, plus 20mm veneer, etc. so I had to counterbore the interior side a bit at the binding post locations to reduce thickness.
Enclosure Assembly:
Construction adhesive was standard Titebond wood glue throughout. The box sides were all cut with 45º joints, so the panels could be folded together, making no butt joints visible from the sides. There panel was inset with rabbit joints and body putty (bondo) was used at the rear panel interface with the box sides to hide the seams. Bondo was also applied to the chamfers. Top and bottom roundovers on the baffle were initially started with a roundover bit and then sanded further to smooth the transitions.
Wood backed; 20mm thick maple burl veneer was adhered to the box exterior using contact cement. Because this type of veneer leaves visible seams, which I wanted to hide, I went with a guitar burst-type finish that used two types of transtint dye (black and red mahogany) to provide a lighter center panel with darker edges. A process of multiple layers of dye application and sanding more toward the center was used starting with several coats of black dye, followed by several coats of red mahogany dye, with sanding in between was used to create the burst effect. There are several YouTube videos around that illustrate this approach. The final finish was numerous coats of water based satin poly with sanding between coats and then wet sanded, polished, buffed and waxed to get the final smooth, fairly glossy finish.
The baffle was paint is several layers wood glue/water mix, followed by primer, sanding between all, followed by several coats of Krylon Rust Protector Metallic Finish, copper color, sprayed on with the typical rattle can, lightly sanded in between and then clear coated. This color was selected to pull out the copper hues in the dyed maple burl veneer. The slot port in the base of the speaker was painted with black DuraTex, using a fine foam roller.
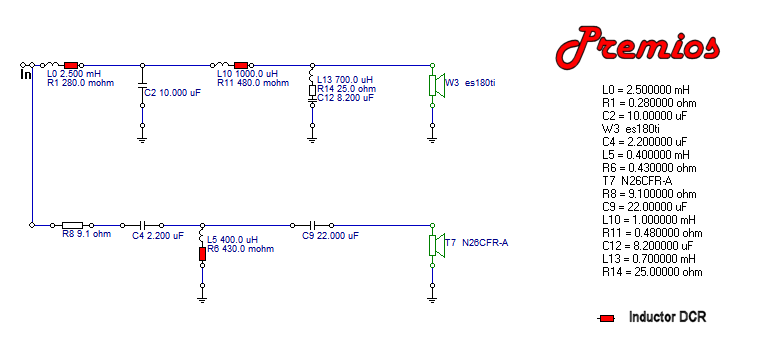
Crossover Design:
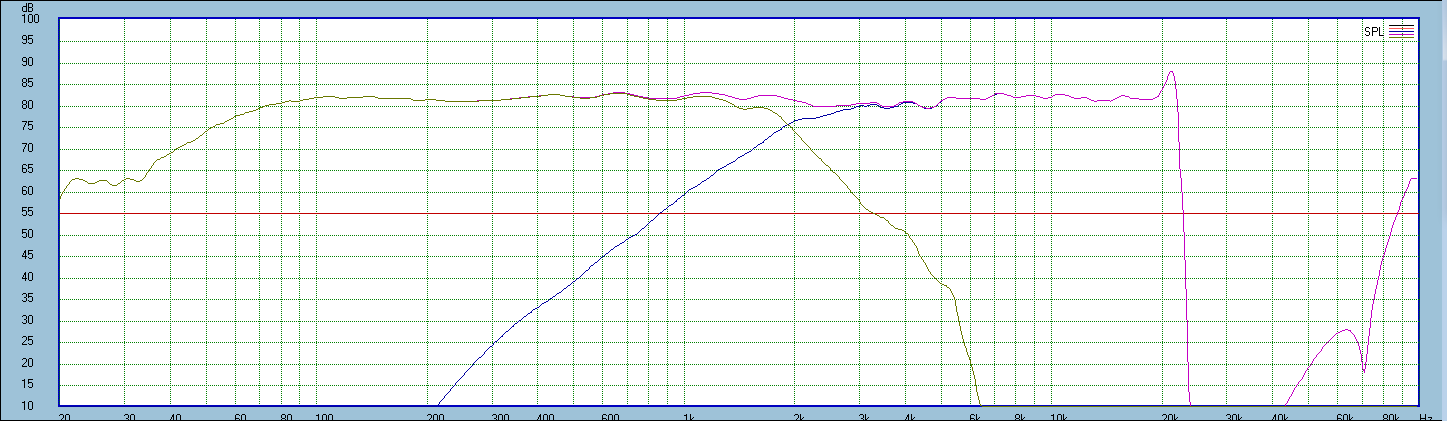
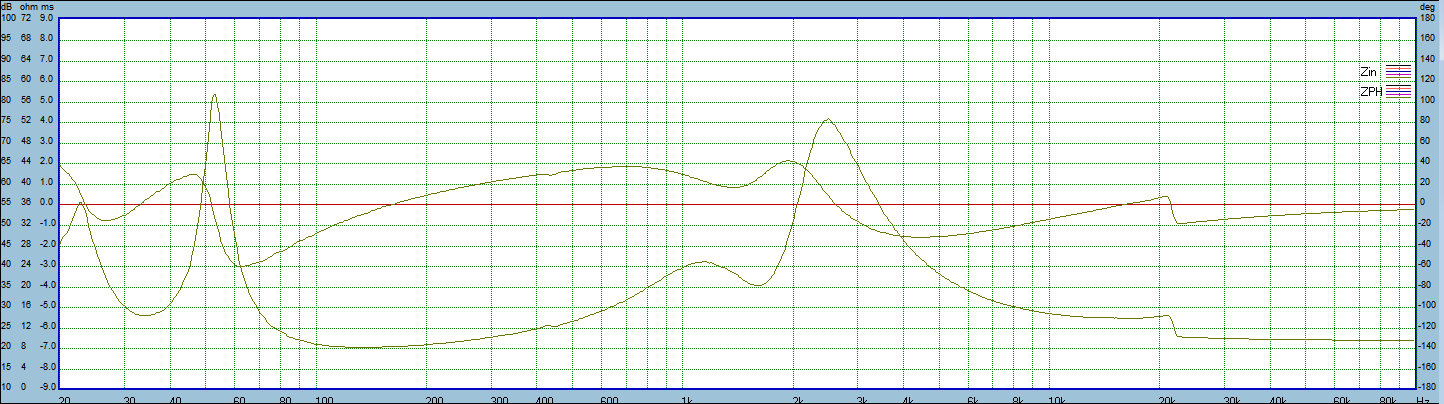
Crossover point is around 1950 hz, with somewhat asymmetrical slopes, though fairly close to LR4, the tweeter about halfway between 3rd and 4th order and woofer between 4th and 5th order slopes. Crossover slopes are approximately 2nd order between the mid and tweeter and 4th order between the woofer and mid. All drivers are wired with standard polarity. A notch filter was utilized on the woofer to shape its response coming into the crossover as well as down into the stop band. This allowed the both the frequency response and power response to be tweaked for a smoother overall result. The in initial inductor on the woofer is an iron core, to cost effectively reduce insertion losses. Remaining inductors are all air-core and caps are all polypropylene. The total parts used in the crossover design are 10, however that includes the 3-part notch filter. Full baffle step was included in the design. Power response is quite flat, with a slight slope downward as frequency increases, as evidenced by measured RTA in room results. Impedance stays above 8 ohms throughout.
Tips & Tricks:
The 3 sided slot port that uses the stand as the fourth side is a unique design feature of the Premios I’ve not seen incorporated elsewhere.
Conclusion:
This was a fun and rewarding design and build. The build has its challenges, with the angled, slanted panels, but went fairly quickly. These small stand-mount speakers, though low sensitivity, dig extremely deep even when compared to many larger floor standers, yet have a smooth engaging midrange and some of the best sounding highs you will hear in any speaker. Though there are spl limits one will reach with a single 7” driver, modelling indicates a pair of these will be able reach around 100 dB before exceeding xmax, for anything other than sub 30hz content.
About the Designer:
Dan is a member of the Parts Express Speaker Design Team. He has been designing and building speakers for over 10 years and has designed and built and/or developed crossover designs for more than a dozen award winning speakers during that time. He brings to the hobby a love for both audio and woodworking.
Parts Used:
2 – Part # 295-397: Dayton Audio ES180Ti-8 7″ Esoteric Series Woofer 8 Ohm
http://www.parts-express.com/dayton-audio-es180ti-8-7-esoteric-series-woofer-8-ohm–295-397
2 – N26CFR-A: Transducer Lab 26MM HM Carbon Fiber Dome Tweeter
1 – Part # 091-3620: Carbon Fiber-Wrapped Gold-Plated Five-Way Binding Posts Two Pair
http://www.parts-express.com/carbon-fiber-wrapped-gold-plated-five-way-binding-posts-two-pair–091-3620
1 – Part # 260-540: Parts Express Speaker Gasketing Tape 1/8″ x 3/8″ x 50 ft. Roll
http://www.parts-express.com/parts-express-speaker-gasketing-tape-1-8-x-3-8-x-50-ft-roll–260-540
1 – Part # 260-111: Acry-Tech DuraTex Black 1 Quart Roller Grade Cabinet Texture Coating Kit
http://www.parts-express.com/acry-tech-duratex-black-1-quart-roller-grade-cabinet-texture-coating-kit-with-textured-3-r–260-111
1 – Part # 081-440: Parts Express #6 x 1” Deep Thread Pan Head Screws
http://www.parts-express.com/6-x-1-deep-thread-pan-head-screws-black-100-pcs–081-440
1 – Part # 081-425: Parts Express #8 x 1” Deep Thread Pan Head Screws
http://www.parts-express.com/parts-express-8-x-1-deep-thread-pan-head-screws-black-100-pcs–081-425
2 – Part # 266-556: ERSE 2.5mH 18 AWG I Core Inductor Crossover Coil
http://www.parts-express.com/erse-25mh-18-awg-i-core-inductor-crossover-coil–266-556
2 – Part # 255-250: Jantzen Audio 1.0mH 18 AWG Air Core Inductor Crossover Coil
http://www.parts-express.com/jantzen-audio-10mh-18-awg-air-core-inductor-crossover-coil–255-250
2 – Part # 255-042: Jantzen Audio 0.70mH 20 AWG Air Core Inductor Crossover Coil
http://www.parts-express.com/jantzen-audio-070mh-20-awg-air-core-inductor-crossover-coil–255-042
2 – Part # 255-032: Jantzen Audio 0.40mH 20 AWG Air Core Inductor Crossover Coil
http://www.parts-express.com/jantzen-audio-040mh-20-awg-air-core-inductor-crossover-coil–255-032
2 – Part # 027-135: Audyn Cap Plus 2.2uF 800V Double Layer MKP Metalized Polypropylene Foil Crossover Capacitor
http://www.parts-express.com/audyn-cap-plus-22uf-800v-double-layer-mkp-metalized-polypropylene-foil-crossover-capacitor–027-135
2 – Part # 027-117: Audyn Cap Q4 8.2uF 400V MKP Metalized Polypropylene Foil Crossover Capacitor
http://www.parts-express.com/audyn-cap-q4-82uf-400v-mkp-metalized-polypropylene-foil-crossover-capacitor–027-117
2 – Part # 027-118: Audyn Cap Q4 10uF 400V MKP Metalized Polypropylene Foil Crossover Capacitor
http://www.parts-express.com/audyn-cap-q4-10uf-400v-mkp-metalized-polypropylene-foil-crossover-capacitor–027-118
2 – Part # 027-120: Audyn Cap Q4 22uF 400V MKP Metalized Polypropylene Foil Crossover Capacitor
http://www.parts-express.com/audyn-cap-q4-22uf-400v-mkp-metalized-polypropylene-foil-crossover-capacitor–027-120
2 – Part # 004-9.1: Dayton Audio DNR-9.1 9.1 Ohm 10W Precision Audio Grade Resistor
http://www.parts-express.com/dayton-audio-dnr-91-91-ohm-10w-precision-audio-grade-resistor–004-9.1
2 – Part # 004-25: Dayton Audio DNR-25 25 Ohm 10W Precision Audio Grade Resistor
http://www.parts-express.com/dayton-audio-dnr-25-25-ohm-10w-precision-audio-grade-resistor–004-25
UltraTouch denim or other acoustic fill material as described.
Looks like a copy of an ’80s Wilson Audio speaker.
Yes, they look just like the ’80s Wilson Audio Watts. Are you going to design a copy of the accompanying Wilson Audio Puppies – the subwoofer/stand for the Watts?
There was no intent to create a copy the Wilson Audio design with these. I don’t anticipate doing a subwoofer/stand for these as they are good to 30hz on their own and in doing so, are not very sensitive. However, one could quite easily add a sub/stand, perhaps high passing these with a preamp/receiver and let the sub cover the bottom octave or two, thus allowing them work for higher spl/HT applications.
Awesome design and execution Dan! These actually bear very little resemblance to the Wilson WATT – aesthetically or technically. And my money says they sound better than the WATT. Well deserving of everyone’s respect and appreciation.
Sure they look like the Wilson WATTS. Given the, hopefully, advances in driver creation, I hope they are as good as these 35 year old speakers. But, if I had a choice, I’d choose a known quantity, especially because I may be able OT the accompanying woofers for the WATTs.
Dan, these look incredible. I love the veneer dye and finish. Any chance you have some additional pics of the build and more details on the cabinet dimensions? For pics, I am trying to better envision the damping and insulation design that you outline. I realize this post is a couple years old but I just finished a couple “easier” cabinet designs and would love to try and replicate this more challenging design while I can still find most the parts for sale. Thanks in advance for any additional details you can provide!
Casey,
Thanks! Yes, I have cad drawings with all the individual parts fully dimensioned and also cut sheet, etc. I have more construction photos as well, which would probably help you. If you want to contact me at my hotmail address, dlneubec@ then add the hotmail.com, I can email it all to you.
Beautiful Dan, would love to have a copy of your drawings. thanks John
Thanks, John. If you would email me directly to my hotmail address listed above, I can send you the plan set.
You certainly are very detailed in your approach, build procedure etc. …Thats so cool of you. I am rebuilding my 4th truly inexpensive pair of bookshelfs, purchased at goodwill. It’s my favorite thing to do now. I improve them as much as possible. The difference as I’m sure you know well, Is very noticeable. I want to start a Brand new pair of 2 way bookshelf type. Would really welcome any advice and suggestions. Thanks for sharing your gorgeous craftsmanship!
Please review the “Crossover Design” section. Something Ain’t right. Is this a 2 way or a 3 way? Having said that, it’s a lovely pair of speakers.
The crossover schematic itself is correct and it is a 2way. There was an inadvertent line in the description that was not edited out.. If you remove the second sentence in the crossover design description, it will make more sense. Thank you for catching that mistake. Sorry for any confusion.
The crossover schematic itself is correct and it is a 2way. There was an inadvertent line in the description that was not edited out.. If you remove the second sentence in the crossover design description, it will make more sense. Sorry for any confusion.
The crossover schematic itself is correct and it is a 2-way. There was an inadvertent line in the description that was not edited out.. If you remove the second sentence in the crossover design description, it will make more sense. Sorry for any confusion.
The crossover schematic itself is correct and it is a 2-way. There was an inadvertent line in the description that was not edited out.. If you remove the second sentence in the crossover design description, it will make more sense. Sorry for any confusion.