The Bantams


Designer:
TomZ
Project Category:
Bookshelf Speakers
Project Level:
Beginner
Project Time:
Beginner
Project Cost:
Under $100
Project Description:
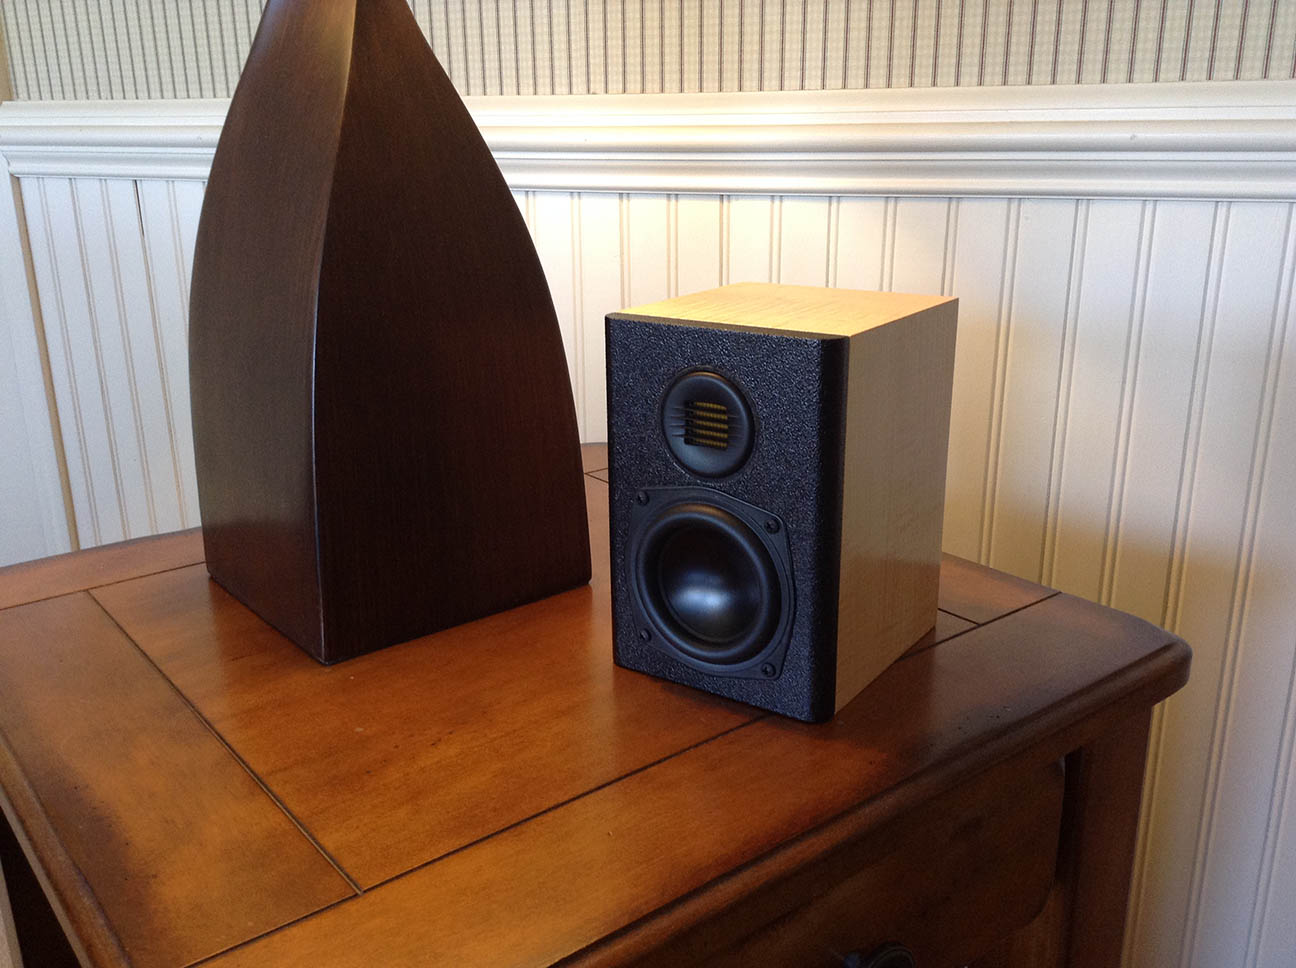
I would describe this system as a ‘micro’ speaker system without the ‘micro’ sound. It produces deeper bass and more detailed highs than most tiny speakers of this size. The idea for this speaker formed over time as I’ve begun to realize that I tend to listen more and more to smaller subwoofer/satellite systems as opposed to the larger, tower-type speakers that I’ve always associated with high quality sound. Although I’ve built many of the fantastic performing mini/small speaker designs that other folks from PE’s Tech Talk board have designed, I realized that I’ve never designed one myself, and thought it was time to give it a shot.
Design Goals:
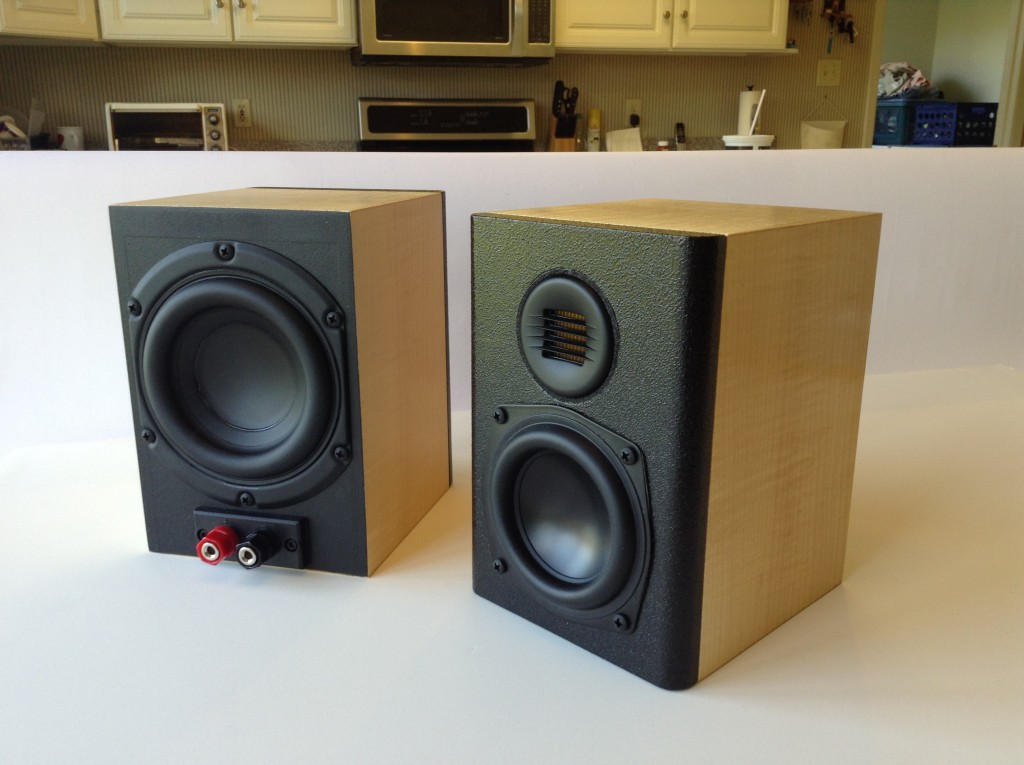
My goal for this design was to create an extremely small speaker with reasonable bass output, as well as a nicely executed and sparkly top end. I also wanted to use one of PE’s Denovo brand pre-cut cabinets so anyone could easily build these. This design employs a Peerless 3.5″ passive radiator in lieu of a traditional vent. Using the passive radiator in this system had a few positive results. First, it allowed for a reasonably low tuning with a shallow roll-off in a box size that would have been difficult with a vent. Secondly, I was able to use the frame of the PR as a crossover mount, which simplified crossover assembly and mounting in such a tiny box. Although the passive radiator is small at 3.5″, it takes up almost all of the back of the enclosure, leaving room for only the smallest of binding post terminals.
Driver Selection:
Since I wanted this to be a miniature speaker, but also have a ‘higher end’ sound than you might normally see in this size, I went with the #290-224 Dayton Audio ND 91-4 woofer, and the #275-195 Dayton AMTPOD-4 tweeter pair — which is actually designed to be used in an automotive environment. These drivers are a bit more expensive than are normally used in micro speakers, but after listening to them for some time, I have to say that I feel the extra expense was worth it.
Enclosure Design:
Using the PE supplied Denovo .04 cubic foot knock-down boxes made assembly quick, and super-simple. They only go together one way so you can’t do it wrong, and the machining is so precise, the seams fit perfectly — even when just dry fitting the panels together. If you don’t have the tools to cut panels perfectly square, or just want to try an easier way to build a box for a change, these knock-down cabinets are top-notch. They even seem to use a nicer grade of MDF than what I can get locally.
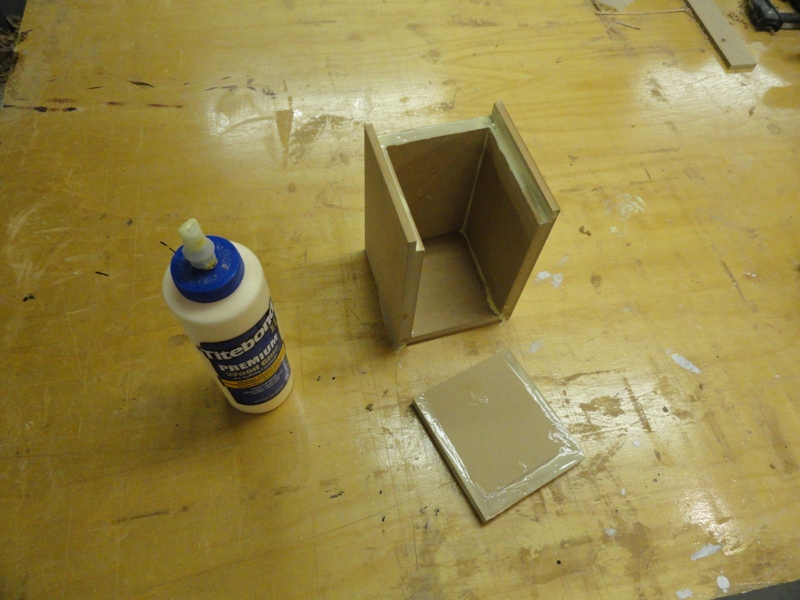
Enclosure Assembly:
I used Titebond II wood glue and spring clamps because I had them, but you could easily use tape to hold things together until the glue dries as long as you’re not using an expanding/foaming polyurethane glue. After removing the clamps I sanded the seams until they were all flush. The boxes are wisely designed with an ever-so-slight bit of extra material right where you want it, at the seams. A few passes with medium/coarse sandpaper makes the surface flush with the adjoining panel, ready for veneer or paint.
The baffles come already rounded-over on the vertical sides. A light sanding of these round-overs with medium grit sandpaper smoothes the machine marks. I also slightly softened all the remaining edges of the baffle with medium grit sandpaper as well, since I intended to paint them black. If I were veneering the baffles, I would have chose to keep the edges sharp. I also made sure to caulk the inside seams of the cabinet with silicone caulking as I went to be sure there are no air leaks.
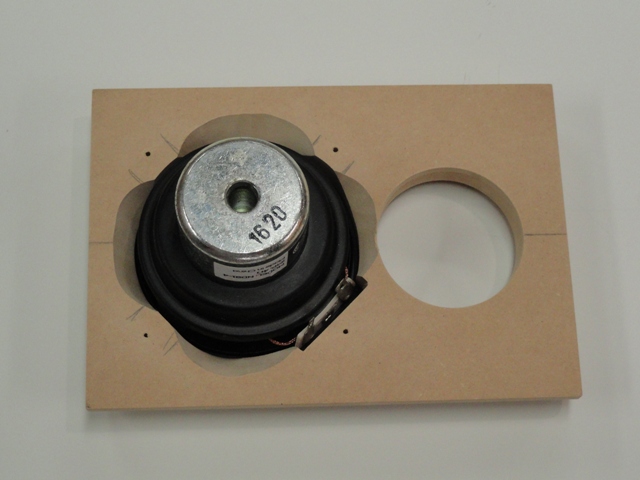
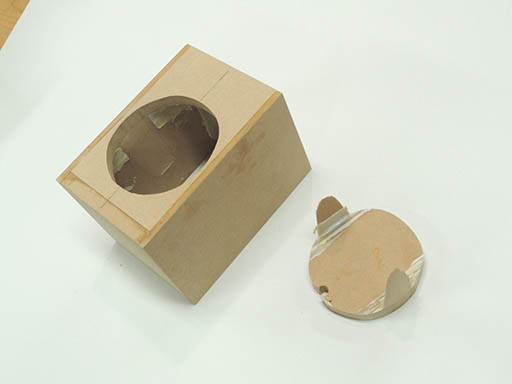
Machining the openings in the baffles and cabinet takes time and a bit of precision. I mounted the tweeter in a 2″ hole, 1–5/8″ down from the top of the baffle and centered left to right. The woofer hole is 3–1/8″ and is centered 2 1/8″ from the bottom of the baffle. I cut the tweeter hole with a fostner bit starting with a small 1/8″ pilot hole and drilled the finished hole from both sides to eliminate tear-out. The woofer hole and terminal relief was cut with a jig saw. Be careful with this as there is not much of a flange on the woofer to cover the opening. Mark and drill small pilot holes to mount the woofer at this time. While we’re on the subject of pilot holes, I used a center punch to locate every screw hole on this entire project, and I also made sure to use a drill bit that was as big as the shaft of the screw I intended to use.
The passive radiator opening is 3-3/4″ and is on the rear of the cabinet, with its center at 2–15/16″ down from the top and centered left to right. The PR will be in the top portion of the cabinet, which should have just the two seams for the sides visible, not the third rear seam — leave that for the bottom where nobody will see it if the seams ever show through the veneer or paint. I cut the PR opening with a jig saw. You will notice that the jig saw may dig into the sides of the cabinet slightly, that is normal… just take it slow and try and stay on the line. Mark and drill your pilot holes to mount the PR at this time.
The holes for the binding post terminal are 5/8″ from the bottom of the rear of the box and 3/4″ apart. I drilled these holes with a 3/8″ drill bit, using the leverage of the tip of the drill bit against the inside bottom of the enclosure to ‘elongate’ the hole a bit until the terminal fit in just fine with room for the quick disconnect fittings. I had to bend the terminals a bit closer to the binding post shaft to make everything fit. Mark and drill your pilot holes to mount the binding post terminal at this time. As you can see, it’s a tight fit on the back of the cabinet but if you’re careful, everything should fit just fine.
The woofer is tiny, and even in 1/2″ material there is not much breathing room through the driver frame. I used a drum sander to ‘open up’ the areas where the driver ‘breathes’ leaving the drill hole ‘spokes’ untouched so the screws would have enough ‘meat’ to bite into. I did this for the passive radiator as well, although it ‘breathes’ a bit better with no magnet and more openings in its frame. You can also use a router to do this, but I can’t always see what I’m cutting with even a small trim router and there is little room for error when working with something this small.
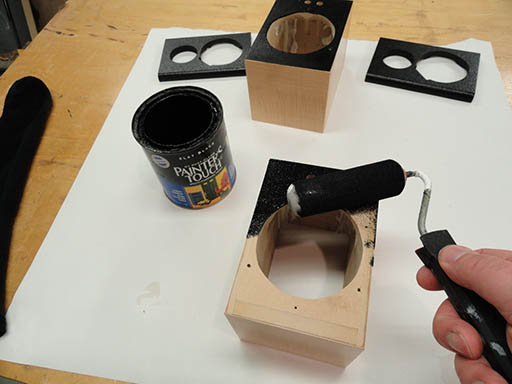
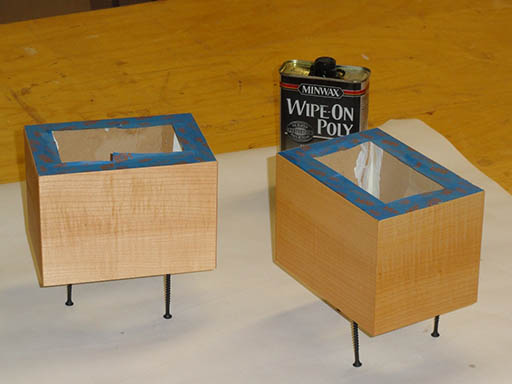
I chose a light colored ‘figured maple’ veneer for the sides, top and bottom of the enclosure to provide nice contrast with the black baffle I had planned on using. Since the back of the box is mostly passive radiator, I opted to just paint that black and make life easy. You could also paint the bottom of the box as well as opposed to veneering it, but I happened to have enough small pieces of veneer to do all four panels. After the box is sanded smooth, tape off the areas where you don’t want polyurethane, or whatever you choose as your finish, especially the front where the baffle will glue onto. I use Rustoleum’s wipe-on poly because it’s easy, looks good, and doesn’t smell so bad that I can’t apply it in my basement. 5-6 coats should get you a pretty nice finish.
The baffle was taped off and primed with BIN shellac base primer, sanded smooth with fine sandpaper, and painted with Rustoleum textured paint. I used four 2–1/2″ drywall screws driven slightly into the woofer screw holes to hold up the baffle as I painted it. The texture paint needs to be applied slowly in several coats, I used 5 very light coats. If you put on too much at one time, it will drip and you will need to start over so take it slowly. The first coat hardly covers up the white primer, and by the fourth or fifth you can still see some of the light color underneath. It’s a good idea to change up the direction of your spray pattern each time for a more even texture. I finished up with gloss black paint by Krylon for a nice, glossy look that will contrast nicely with the light colored cabinet. Follow the instructions on the paint you use for re-coat times.
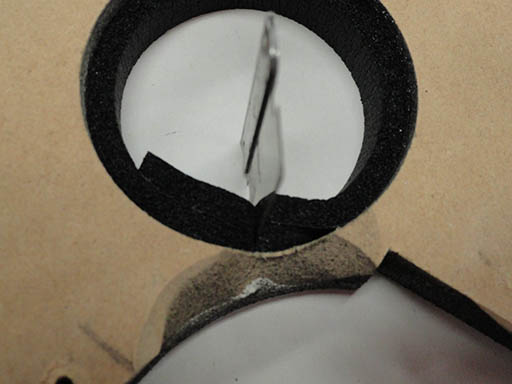
After all finishes have had a few days to dry, it’s time for some assembly. I mounted the tweeter before attaching the baffle since it is a bit tricky to mount as it’s really designed for automotive stick-and-press usage. The best solution I found was to use a full wrap around the inside of the tweeter hole with the Parts Express speaker gasket foam tape, the 1/2″ wide variety. You may have to clean up the tweeter hole with some sandpaper first. Don’t stretch it as you apply it, but press it firmly into the baffle. If you put the baffle face down on a smooth surface, it’s easier to get the foam tape flush with the baffle. Cut the gasket tape about 7″ long so it overlaps, then trim both layers with a razor blade, then remove the tape under and over the cut, then press firm.
The tweeter will push in with some resistance and may need some twisting to get it in just right. If you’re careful and fiddle with it a bit, you can get it nearly flush with the baffle with just a bit of the tweeters curved flange showing. I admit, this process is a bit tricky to get right. My first try looked great, my second try was not as good and I actually ended up redoing it after the cabinet was assembled. It helps to lightly sand the gasket material to remove the ‘grippy’ rubber skin on the gasket so the tweeter will slide easier. Make sure the fins on the tweeter grill are horizontal when you finish. The foam gasket will have some ‘bounce’ to it, so I filled the gap between the tweeter and baffle with construction adhesive. This will ‘firm up’ the tweeter in the baffle. I shot a blob of silicone where the wire exits the tweeter as well, just in case the tweeter is not air-tight.
I glued the baffle to the box with Gorilla brand construction adhesive. I used this as opposed to glue because I allowed the black paint to ‘wrap-around’ the rear of the baffle ever so slightly so there would be no ‘unpainted’ line on that part of the speaker. The construction adhesive laid thick like caulking, but allowed for a good set up and close baffle-to-box alignment. Also, being thicker, it negated the need to seal those seams with silicone later on. Wipe any squeeze-out right away, it should come right off a polyurethaned box. Let that dry for a good 24 hours before proceeding as the adhesive is all that holds the baffle to the box.
Crossover Design:
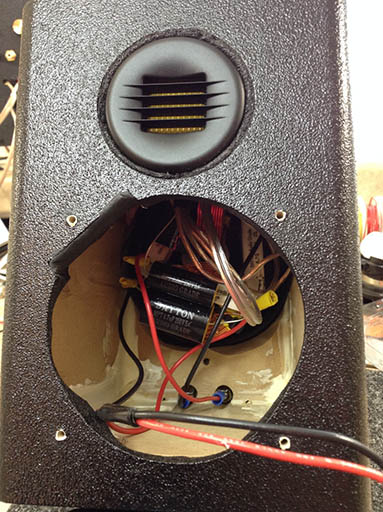
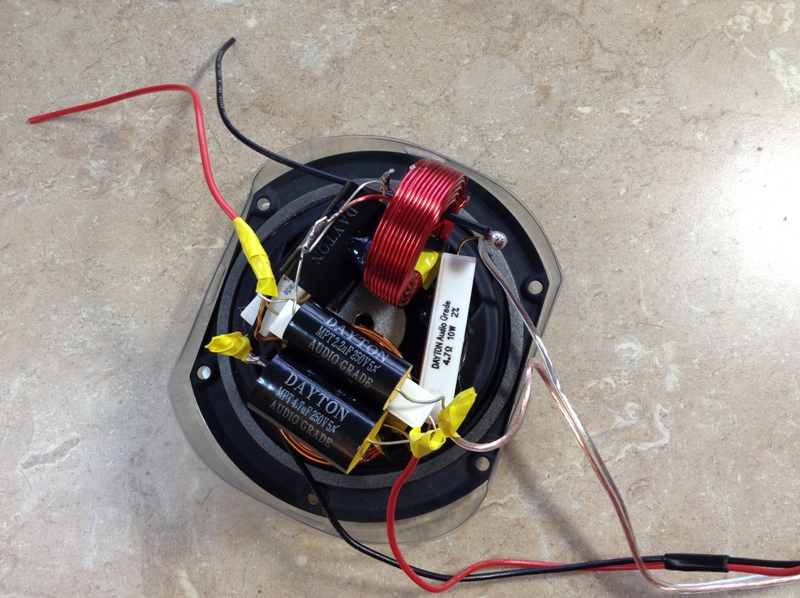
The crossover uses 8 components, and they all fit nicely on the back of the passive radiator for convenience. I designed a second order crossover for the woofer with a response-shaping resistor in series with the coil. The tweeter filter is a third-order with two resistors for shaping and level-matching. I used hot glue and zip-ties to hold down the two inductors first and worked the rest of the components around them. With some fiddling, I was able to get everything wired point-to-point except for one ground jumper wire. The passive radiator has very good venting around it’s basket and installing the components on the basket frame did little to restrict airflow around the rear of the PR.
Knowing that placing air core inductors next to metal such as a PR frame would change their values, I tested the specs of the inductors with the DATS while mounted on the passive radiator to see if the changes in value were detrimental to the design. Though the two inductors are mounted close to each other and secured to a metal frame, I measured fairly minor changes in values… nothing that was a problem.
One note: The tweeter has no markings on the wire or driver itself to indicate what the polarity is. I assumed that the copper colored wire (as opposed to the silver colored wire) was the positive (+) lead and wired it up under that assumption. I may be wrong on that assumption, but either way, wire the copper colored line to the positive connection on the crossover as indicated in the schematic. I cut some of the wire off the tweeters built-in leads as they were longer than necessary.
The ND91 woofer is an amazing driver. It’s doing the majority of the work in this design as the crossover point lies somewhere between 6,500 and 7k Hz. It’s underhung voice coil and copper shorting ring keep distortion low, and it’s got huge excursion ability with a 25mm peak-to-peak swing to prevent damage on bass heavy passages. Looking at the passive radiator undulating massively during bass-heavy music, you start to get an idea of how a speaker this small can produce so much bass.
I was relieved as I listened to the completed speaker turning the volume up higher and higher…the tweeter didn’t sound stressed at all, even at loud volumes — and it maintains a clear presentation until the woofer finally does begin its rise in distortion and forces you to turn it down a bit.
Tips & Tricks:
I used a small 4″ x 4″ piece of denim insulation on the inside top of the cabinet. I ripped the piece of 2″ thick insulation apart to yield two approx. 1″ thick pieces, which I adhered to the inside of each cabinet with spray adhesive. I don’t know if this made much of a difference as I didn’t test its effectiveness, but hopefully it calms down any in-cabinet resonances a bit. If you left it out, however, it wouldn’t probably be an issue.
Since the speaker box is so small, there is little room for deviation on where most of the components are placed. The passive radiator and binding post terminal on the back need to be almost exactly where they are in order to fit, as well as to not have any screws being driven into the end grain of the 1/2″ thick MDF, which may cause a split in the wood. Measure carefully and dry fit/mock up the pieces before cutting anything. The notch for the woofers terminals is a good example of being very careful. It is easy to remove just a bit too much material, then you will have a gap to fill. It’s best to remove a bit at a time, then check fitment and repeat until it’s perfect.
Another tip is to make sure the tweeter and gasket are where you want them in the baffle before gluing the baffle to the box. As I said, I had to remount one tweeter after the baffles were glued to the box and it was much more difficult to do that way.
Since the woofer is so small the woofers terminals end up being very close to the driver frame, so I put a few pieces of electrical tape on the basket to guard against accidental short-outs in case the terminals get pressed into the basket when mounted.
Two things to look at when assembling the crossover; make sure the components are able to fit through the opening on the cabinet several times during assembly. Also, make sure nothing gets too close to the moving weight in the center of the passive radiator as you hot glue things together. It’s a good idea to make sure the components don’t touch the woofer magnet as well, though if you lay them out as I show in the pictures, there should be enough room. Look for this project on the ‘Speaker Project Gallery’ on PE’s ‘Tech Talk’ Forum for many more crossover assembly pictures.
Conclusion:
I think this is an exceptional sounding speaker, especially given its size. It can produce a good bit of bass thanks in part to the passive radiator, which in this design yielded an almost first order roll-off after the downward turn of the ‘knee’ on the low end. The AMT tweeter has a nice high end with a bit of sparkle to it which I really like. Many tiny speakers sound decent, but won’t play loud without distorting; the Bantams can play a fair bit louder that you would expect — and sound clean doing it. It doesn’t seem that such a big sound should be able to come from such a tiny speaker box — a testament to the quality designed into these two Dayton drivers.
About the Designer:
I’ve been dabbling in speakers since I was a teenager when I built my first set of speakers. Even as a kid I thought they sounded kind of awful… but I had been bit by the bug — and have been striving for better sound and more creative cabinet designs ever since.
Project Parts List
Can we get a wiring diagram for the crossover? This looks like a good first speaker build for me but I’m still learning crossovers. Thank you.
Shaun, There is a more detailed write-up of these speakers in the “Speaker Project Gallery” Forum… here’s a link: http://techtalk.parts-express.com/forum/speaker-project-gallery/1304991-the-bantams-micro-speaker-system
There are a lot of detailed pictures including a schematic for the crossover and step-by-step instructions and pictures of how each crossover component was arranged… you can’t miss if you follow along.
If you decide to go ahead and build these, feel free to post any questions you have on the main Tech-Talk forum. I’ll help any way I can.
Hope you build them, you won’t be disappointed.
TomZ
Would the sound quality be affected by using solid wood to build the cabinets?
Bob, I don’t think the cabinets are big enough panel-wise to incur any issues with using a different type of wood. If you were using something really soft, like 3/4″ pine even, it should be fine as long as you allow for the extra thickness. A 1/2″ wider baffle shouldn’t have enough of an effect on the sound to worry about either, I wouldn’t think.
Really, as long as the cabinets are good and air-tight, any material of at least 1/2″ thickness should be okay. If you notice any vibrations in the middle of the sides, just add a 1/4″ dowel glued in side to side and you would be fine, but I wouldn’t think it would be an issue.
Thanks for the interest in the Bantams. If you decide to build a pair, I’d love to see your progress/finished results on the Tech Talk Forum! Of course, any questions, I’ll help in any way I possibly can.
TomZ
Tom Z, those are gorgeous, I love the use of the passive radiator.
Could other tweeters be used in place of the ones you did in this application? Something that’s easier to mount?
Russ, I don’t know how I didn’t see this until just today. I swear it wasn’t there. Sorry!
If I used another tweeter the crossover would need to be redone and it wouldn’t be “The Bantam’s” anymore if you know what I mean.
Anyway, if the tweeter seems hard to deal with have you checked out Scott’s Heliums? They use the same woofer, a press fit tweeter, and are vented. Here’s the link if you want to check it out: http://techtalk.parts-express.com/forum/speaker-project-gallery/64062-helium-a-true-micromonitor
It is a less expensive version and I bet they sound every bit as good.
Hey, thanks for a reply! I honestly forgot about this until I was ready to build these and wanted to go through your post one more time. I’m going with your design for sure!
Would the sound quality be reduced if I made the box 1/2 ” wider and deeper?
Sorry, I think you already answered that.
Am planing to build a pair of bantums. Your info does not show a configuration for crossover can u provide one.
Sorry Jim, I didn’t see this right away.
There is an extremely detailed set of instructions on the crossover assembly available on Tech Talk here: http://techtalk.parts-express.com/forum/speaker-project-gallery/1304991-the-bantams-micro-speaker-system?p=1304994#post1304994
Best of luck,
Tom
I really want to build some small nearfield speakers to be used by my computer – your article is very informative. A couple of questions: Being vented at the back of the case there probably is a restriction on how close the speaker can be placed to a wall? If so, would it possible to vent through the bottom baffle (wall mounted) or the side without changing the characteristics of the speaker (obviously I would have to increase the size of the case for the passive radiator to fit)?
Rolf
Building a Bantam Speaker and they are out of stock on the 2.2 uf capacitor #027-415 and the 5.1 capacitor #027-423. Any suggestions about where to get replacements or should I wait for these. One wont be available for 2 months.
If I was you I would spend a little extra & use The Dayton Audio – Precision 1% Metallized Polypropylene Capacitors in stead of the 5% versions you were planning on using. The 2.2uf capacitor is part # 027-216 & the 5.1uf capacitor is part # 027-232. They may cost more but they are even better quality than what was used in the design & will only sound better in the end. I have used them before in my builds & they work excellent & you won’t have to wait till 4/13/2017 just to finish building your crossover. Hope this helps you out.
I seen “The Bantams” speaker build you made Tom & totally liked the design & I had to make my own stripped down versions. I just love small speakers with a big sound & these are a great example of that. I used the ND91-8, 8-ohm version driver instead of the 4-ohm version, & did away with the AMT tweeters & crossover design & made a set of passive radiated full range speakers to simplify the design & lower the cost to build them so they could fit into my budget at the time of building them. Even without the use of AMT tweeters these little 3 1/2″ drivers sound very nice & warm on there own. I never thought that a small set of speakers like these would produce the quality sound that they do & the bass output is also pretty good for there small size. I would like to thank you for thinking up the excellent design & inspiring me to build my own version that I call “The Bams” only because they have half the parts inside the enclosures & was based off of you excellent design. Keep up the great build ideas & continue to inspire others like me to build your own speakers & have fun doing it along the way. Can’t wait to see what you think up next.
Rolf,
Sorry I didn’t see your comment sooner. I’ve set up to notify of added comments.
I don’t see any real problem with having the PR on the side, as long as you are careful to avoid interference with the basket of the PR and magnet/basket assembly of the driver. You may have a slight bit more vibration that way as well as some of the output of the PR and driver are in-phase at some frequencies. As long as you rigidly attach the cabinet to the wall you should be fine.
I would not bottom-mount the PR. There is a bit of weight on it and it would sag for sure over time. It’s a small little PR and not heavy-duty by any means. It’s fine for it’s intended use, but generally PR’s should not be down/up firing.
Actually, since it’s not vented, I would think it would operate fine to within 3 inches or so of a rear wall. A vent has much higher air velocities than a PR since a PR achieves similar output with less air speed and more surface area. Also, I bet it picks up a bit of extra low-end being that close to, or mounted on a wall, might sound pretty nice!
Bob,
Again, sorry for the delay, I’ve set up to notify of added comments. Still learning how to do this!
For the 2.2 you can use part number 027-216 and for the 5.1 you can use #027-232. It’s usually okay to substitute with similar parts as long as the basic specs are similar and the designer hasn’t specified something specific for a particular reason. I used what I had on hand so there’s nothing special about the specific parts I used for the most part. NOTE: I have not actually used the replacement parts I’m suggesting, so they may be a slightly different size. Probably fine, just wanted you to be aware.
Thanks everyone!
I don’t even qualify as a beginner, so… dumb questions: Is each speaker identical? I.e., does each box have a tweeter, a driver (the mid-sized speaker), and a passive radiator in back? I’m guessing maybe not, as the parts list just says one driver (but two tweeters, two passive radiators). Also, at current prices at Parts Express, it appears the cost is not “under $100” but $179.06 + shipping (assuming one driver is correct). They sure are interesting, though!
David,
Sorry, the parts list is off, there are two of the ND91 woofers used, one in each cabinet. The tweeter quantity count is one, but that is because they are sold in pairs, two to a box. The woofers are sold individually. So… one tweeter, one woofer, and one passive radiator per box.
Yes, the total cost is getting close to $180 for the pair at this point, but that includes the box and everything needed to finish except a can of rattle paint and/or a little veneer to cover the boxes with.
Sorry about any confusion.
Please check this link if you already have not done so for more information and a concise parts list on this design: http://techtalk.parts-express.com/forum/speaker-project-gallery/1304991-the-bantams-micro-speaker-system?p=1304995#post1304995
Also, if you have further questions or want to try to build a set if you post any questions there, it would be easier to help you at that forum rather than here. There are no dumb questions, especially when you’re starting out. There is a lot to a working speaker design and therefore a lot to learn and figure out. We’ve all been beginners at one point. It’s exciting to build a set of speakers and have them sound awesome… built by your own hands.
Tom Zarbo
Just wired my first crossover. Would your plate amp. be a good one to power the bantams or not enough power?
My experience with the Bantams is that they need a bit of power to really sing. I’m using an 80 watt per channel Onkyo amplifier to drive them with and it’s not too much power, I can get the volume knob cranked up pretty loud. As you can imagine, a 3″ woofer isn’t very efficient.
I don’t think the Micro-B 2.1 plate amp would provide enough power to really get the most out of the Bantams in my opinion. I’d be looking for 50 watts per channel or thereabouts.
Would your plate amp be a good power source, – the sub, for the bantams?
your speakers look awesome and i would like to build them too. for some reason i cant post in the forum you made on how to build them. i was wondering if the Dayton Audio ND20FB-4 Rear-Mount Part # 275-035 tweeter work instead? this would be my first build and i would like to keep things a cheap as possible.
Chad, thanks for the positive words about the Bantams. If you were to change the tweeters, you would really need a complete re-do of the crossover, you couldn’t just swap tweeters and expect it to sound proper.
If you’d like to save a few bucks, have a look at Scott Sehlin’s Helium speakers… here is a link: http://techtalk.parts-express.com/forum/speaker-project-gallery/64062-helium-a-true-micromonitor
It uses the same woofer and a different, less expensive tweeter, as well as a vent to keep costs down. They perform very well and would sound similar I would think. You might even be able to eliminate the vent and use the passive radiator on the back if that’s one of the aspects that you really wanted… just stick with Scott’s crossover and driver compliment.
thanks for getting back to me. i was looking at scotts speakers a few months ago. i had all the parts i needed in my cart and then my computer crashed and lost all the parts. it took me awhile to make the parts list cuz parts express doesnt sell a couple parts anymore and he also got some from a different site. i really like how you made a nice parts list. it was really easy to find everything.
Neat idea with the textured paint and passive radiator in back. As others have stated seems like a very good first project.
Would like to see any graphs of the finished product, such as, freq/SPL
Cameron, check the link I posted for Jim above for more information on these speakers.
I really love these! I’m looking to build a pair very similar in size but using a full range driver along with the passive and make them powered speaker as well (I know it’ll be tight for room), I also wondered if you still have them and did you ever do a sound test video just to give the nearest of hints at their performance? Thanks in advance and once again I’m really impressed with these and my wife will be too!
Hey Martin,
I’ve never done a video clip of these playing. I don’t think it would really be an accurate representation of how they sound. Glad you like them!
Thanks for taking the time for replying Tom. Yeah I know it’s a counter active thing to do when you record speakers (reflections, compression,recording equipment adding their own interpretation) I just thought on the completion of the project as a record you may have taken a video of them. Hey not to worry Tom and once again they’ve inspired me and they have the wife appeal ,and hopefully whilst I’m playing music or games through mine I’ll be content with them until I get the Manshed that’s on the wish list and build some nice big loudspeakers! Thanks Tom
I like these speakers but I would like to make them with 4 inch drivers just because.