The D III


Designer: Parts Express Customer
Project Time: 1-8 hours
Project Complexity: Hobbyist
Project Cost: $100-$500
Driver Selection
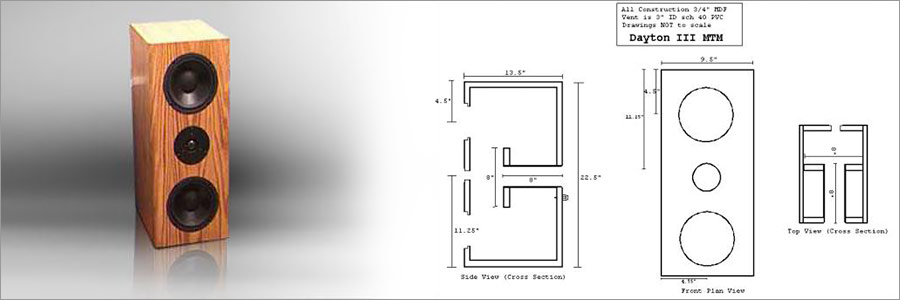
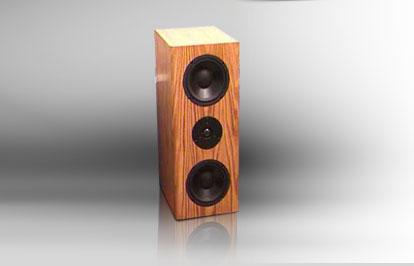
The Dayton III is a 2-way, dual woofer loudspeaker using the Dayton 6-1/2″ paper cone woofer and 1-1/8″ silk dome tweeter. These drivers have been the subject of a lot of discussion on the Parts Express Tech Talk board because they are among the “best bang for the buck” in low price loudspeaker drivers. This woofer is able to produce exceptionally low bass for a given box size and the tweeter produces clean, clear highs. When you hear these speakers you won’t believe that the total cost for drivers and crossover components is under $150/PAIR! I decided to design a dual woofer speaker in an MTM configuration using these drivers because there have been a lot of requests from people to use my earlier designs with the Dayton speakers in this manner. For those of you new to building your own speakers, MTM refers to the front baffle configuration where you have the speakers arrangement comprising “midwoofer – tweeter – midwoofer”. This type of arrangement is widely accepted as having significant improvements over single woofer designs, at the expense of the larger cabinet size and (of course) the extra speakers. By using the Dayton drivers, this speaker has all of the advantages of a dual woofer design at a fraction of the cost of many high-end systems, but certainly provides an “introductory level” of audiophile quality sound.
Amplifier/Crossover Configuration
The crossover’s function in a loudspeaker is to “route” certain frequencies to the individual drivers and to “contour” the response of each driver to give the speaker a smooth, balanced output across the frequency spectrum. You don’t want to send deep bass to a tweeter and you don’t want your woofer trying to reproduce cymbal crashes. Accordingly, a properly designed crossover is the heart and soul of the loudspeaker. Using various methods, the designer can use the crossover to change most every aspect of how the speaker performs — where the soundstage is located, how deep the bass sounds, and many other things that all wrap-up into the final system. A good crossover can make inexpensive speakers sound great, while a poorly designed crossover can make hundreds of dollars worth of exotic European speakers sound terrible. To develop the most accurate and best sounding crossover possible, the CLIO measurement system and CALSOD loudspeaker design and simulation software package were used to develop “baseline” values from crossover components. Once an initial design was obtained, final “tuning” was done by hours of listening and by numerous, reliable ears. The final crossover employed uses a first-order electrical lowpass filter with impedance compensation and a “peak filter” to smooth the midrange response of the woofer. The highpass is a second order electrical filter with a “tilting” attenuation network to provide just enough tweeter padding to match the output of the woofer and a slight rolloff of the high frequency response to give the speakers a relaxed, yet detailed sound. Both drivers are connected with normal polarity. The in-phase crossover occurs at 2khz. All inductors are 18awg air core except the .60mH series inductor in the woofer crossover. That inductor is 14awg. The parasitic resistance (DCR) of the inductors is accounted for in the crossover design and helps shape the response of each driver. Avoid the temptation to use lower gauge inductors as some peaking the filter transfer functions will occur. All resistors are 10W, non-inductive wirewound. All caps are Dayton polypropylene with the exception of the 47uF cap in the lowpass — use a 47uF non-polar electrolytic cap bypassed with a 0.47uF film and foil bypass cap. All the parts are shown in the parts list here. Shown below are both the original crossover for this project and a revised version of the crossover (bottom) with modified component values to account for changes in the Dayton tweeter (relevant to units purchased beginning in July, 2001.) Please note that the currently available parts list is for the original crossover.
Enclosure Assembly
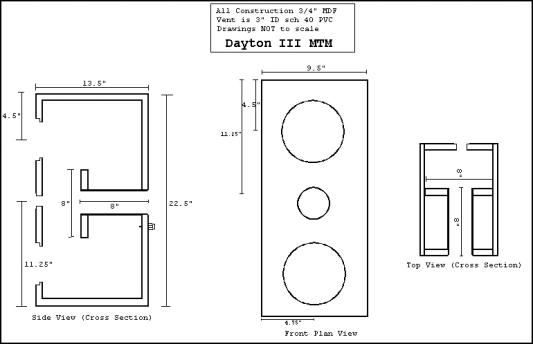
The enclosure for this design was optimized for the deepest bass response possible without sacrificing detail. The result was a 1.17 Cu. Ft (33L gross internal volume) ported cabinet tuned to 36.75 Hz. The final tuning frequency was slightly lower than my original design target of 39hz due to reduced driver dampening by using a 14awg inductor in the final crossover design. The sides are supported with a vertical brace that also supports the inner end of the 3″x8″ rear-firing vent. Vent openings should be slightly flared to smooth the airflow. Construction of the enclosure is quite easy and should take less than a day to cut and assemble the cabinets and baffles. All drivers are flush mounted. The vertical brace, not clearly shown in the diagram, is 8″x8″ with a hole in the center to support the vent. Speaker wire binding posts should be placed near the vent and the crossovers mounted on the rear baffle. Acoustic dampening foam should line the top, bottom, and sides of the enclosure. No foam is used on the rear baffle, but approximately 4 oz. of “AcoustaStuf” should be teased and placed in the rear half of each enclosure to slightly dampen the back wave of the woofer. To help you cut the baffles, I recommend the “Jasper Circle Jig” and the following dimensions: Woofer Cutout: 5 3/4″ Tweeter Cutout: 3 3/8″ Flush Mounting Recessions: Woofer: 3/8″ Radius rabbet, 3/8″ depth Tweeter: 1/2″ Radius rabbet, 3/16″ depth
Conclusion
This project has been exciting and challenging. The true test of an engineer is not how good he can build something, but how well he can use the available means to arrive at a product that exceeds the value of the sum of its’ parts. In this case, the final speaker sounds great, images well and provides an acceptable soundstage. Combining this with the fact that all the drivers and crossover components cost under $150, I believe that this project has been successful. I know that I’ll be enjoying my set for years to come and it will sit proudly among speakers in which a single tweeter costs as much as this whole pair.
Project Parts List
|
Part # |
Description |
Qty |
|
295-305 |
1 |
|
|
275-070 |
1 |
|
|
266-330 |
1 |
|
|
266-806 |
1 |
|
|
266-814 |
1 |
|
|
027-416 |
1 |
|
|
027-424 |
1 |
|
|
027-410 |
1 |
|
|
027-426 |
1 |
|
|
027-352 |
1 |
|
|
027-458 |
1 |
|
|
004-4 |
Dayton Audio DNR-4.0 4 Ohm 10W Precision Audio Grade Resisto |
1 |
|
004-8 |
Dayton Audio DNR-8.0 8 Ohm 10W Precision Audio Grade Resisto |
1 |
|
027-452 |
1 |
|
|
260-302 |
1 |
|
|
260-516 |
1 |
|
|
260-317 |
1 |
I built these a couple of years back and I have been very pleased with them. I use them for TV surround and general music listening. Not too tough to make. Black drain pipe worked great for the vent.
Does anyone have an accurate figure on what the power handling capabilities of the speakers are?
In a word: gobs. Ive clipped a 250w pro amp with these bad boys (turned it down before any real damage) but they could have taken more. Sorry I don’t have a more accurate number for you.
Like Ryan, I’m powering mine with a pro amp. The Crown XLS-1000 pushes 350w into a 4 ohm load and these speakers don’t break a sweat. Despite their low sensitivity, they get louder than I can handle.
Hi – would it be possible to receive the revised/new parts list for this D3 alone? I’m new to this, and quite confused as far as what to purchase since both are listed. Conversely, if you can just let me know what NOT to purchase from the above, that would be helpful. Either way. Thank you!
Built these big puppies back in 2012. With all that 3/4″ MDF they turned out REALLY solid…and heavy. Didn’t weigh them but they felt like about 50 pounds apiece after final assembly. Next, I built a high power version of Elliott Sound Products P101 MOSFET amp which pushes 300 watts/channel. I finished with the Chris Venhaus Cat5 speaker cables. These things employ 54 strands of 24ga solid copper wire per side and truly fit the description of hose pipes. They replaced a highly touted commercial product I’d been using which sounded thin and dull by comparison to the Cat5 set.
With the serious wires and man-size amp the Daytons truly lit up the house. Everyday was like a live concert, whether I was playing rock, folk, classical, or zydeco. The center holds, and the sound stage is deep and wide with these speakers. When I first played them my cat Gizmo came running in and plopped down in front of them, and stayed there for several hours, never moving, even though the spl was pretty high. And he did that every time I turned them on. But the ultimate compliment came from a family friend who enthused, “WOW! Ron, I haven’t heard music like this in forever! Reminds me of some of those old 70’s rock concerts we used to go to! Look at my arms!” She held them out. Big old goose bumps everywhere :).
Alas, in 2014 I had to leave the states and my precious (HEAVY) system behind, settling here to Germany to help care for elderly relatives and will probably be here for several years. But, never fear, I’ve recently begun construction of the new system. There’ll be one on each side of the Atlantic.
I built these with my son for his senior project. We used a Dayton Crossover at 2500hz and The sound is really great. He built these along with restoring a Heathkit AR-15 receiver and the sound is pretty pleasing. Between the upgrades to the receiver and the outstanding selection of drivers, the room is filled with great music. They will get as loud as you can stand as the Receiver is capable of around 60-80 watts with all the mods. The bass is crystal clear and the rear firing port really adds some punch to the clean bass. The mids and highs are very pleasant. Not harsh or muted but just right. The dome tweeter selection for this build was an excellent choice. I will be building these again…
I built these about 1.5 years ago. I followed the schematics for the crossovers to a “T”. I find them to have a serious dip in the midrange. To the point where I had to use a coulee VIfa TC9s with a midrange bandpass filter to fill in. That made them shine, although the bass for a dual 6″ ported box is kind of lacking punch also. I use a 12″ B&W subwoofer to fill in the lows so that doesn’t bother me. I’m just curious are the meant to be mounted a certain distance from walls, in a corner, etc?
They sure look nice because I built them out of Ash 13 ply and stained and lacquered by our finish guy.
Anthony, Dr. J recommended that this speaker stand out from the back wall several inches, but I can’t remember the exact distance. Pity that most of his original writings can no longer be accessed on the internet, or at least I couldn’t locate them. After some experimenting I found that one foot from the rear wall worked well in my squarish room (approx.17’W X 18’L, with 10′ ceilings). I think he also suggested using the typical equilateral triangulation and pointing the units straight ahead with no toe-in. I ended up with the speakers about 4 feet from the sidewalls. My seated couch position was about 8 feet from the rear wall. Worked great.
Some people have a few gripes with the Daytons but I’m not one of them. I’ve heard much more expensive speakers that don’t sound anywhere near as good. And as usual, all sorts of factors are involved. But I work from the principle that the room and the setup are nearly as important as the the quality of the speaker, and I’ve heard some pretty modest speakers sound awfully good when the room was right.
Paul Carmody improved this design by using a different tweeter (Dayton RS series) and by modifying the crossover.
I made the changes & the revised design sounds much better.
Look at the Parts Express Tech Talk under Carmody “refried DIII”